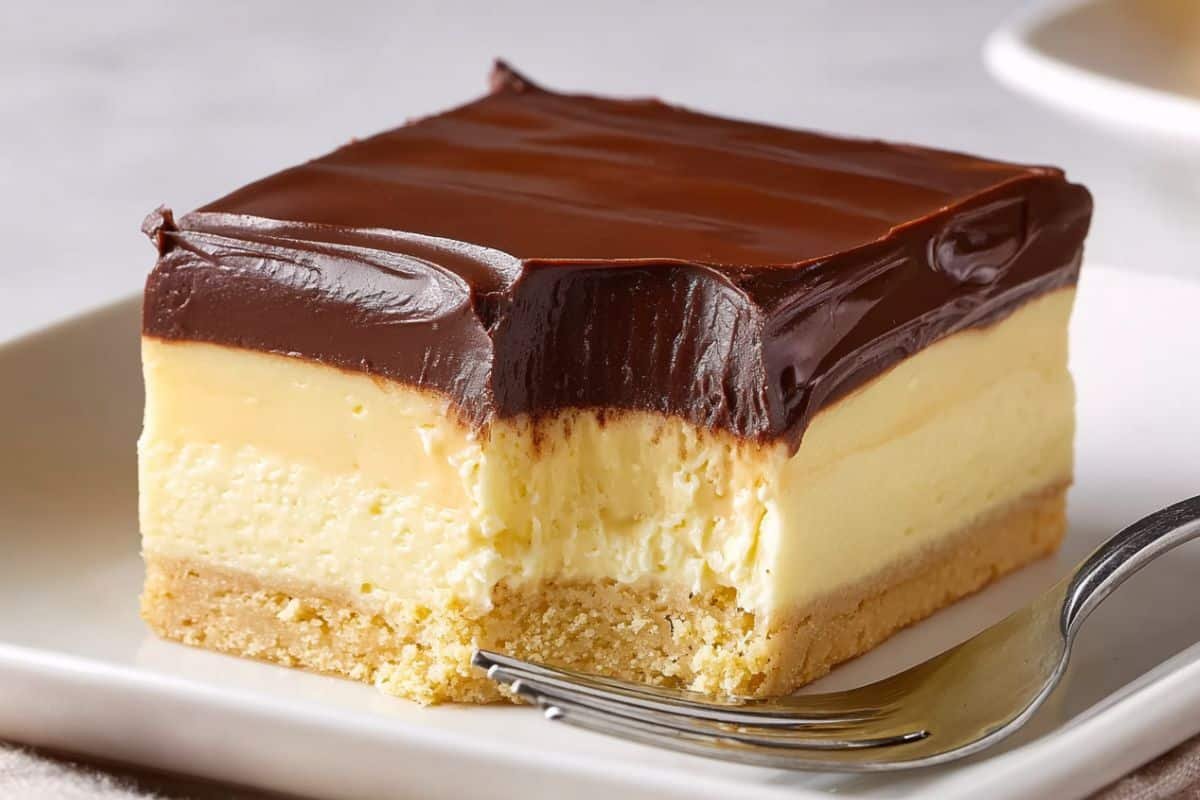
No‑Bake Boston Cream Pie Bars are the perfect crowd-pleasing dessert when you want all the flavor and elegance of a Boston cream pie, without fussing with baking. This chilled treat layers a crisp vanilla wafer crust with creamy pudding filling and a rich chocolate ganache topping. The result? A smooth, luscious bar that delivers the same flavors in a handheld format—ideal for potlucks, summer parties, or any day you crave something sweet but don’t want to heat up the kitchen.
Why You’ll Love This Recipe
These bars are beloved for many reasons:
- Effortless elegance: You get the classic combo of vanilla custard and chocolate glaze without mastering pastry or choux.
- No oven required: Perfect for hot days or when your oven is occupied.
- Handheld convenience: Bars are easy to serve, share, and eat.
- Flexible timing: With chilling time built in, you can prep in stages.
- Decadent flavor: The creamy custard layer paired with silky ganache tastes upscale—but it’s surprisingly simple to make.
Ingredients
For the Crust & Custard Layers
- Cooking spray
- 6 ounces vanilla wafer cookies (about 50 wafers)
- 2 tablespoons granulated sugar
- 6 tablespoons unsalted butter, melted
- 2 (3.4-ounce) boxes vanilla instant pudding mix
- 2 ½ cups cold heavy cream
For the Ganache
- 6 ounces semi‑sweet chocolate (chopped or chips)
- ⅔ cup cold heavy cream
Step‑by‑Step: How to Make No‑Bake Boston Cream Pie Bars
1. Prepare the Pan
Line an 8×8‑inch square baking pan with parchment paper, leaving overhangs on two opposite sides (so you can lift out the slab later). Lightly mist the pan and parchment with cooking spray.
2. Make the Crust
- In a food processor, pulse the vanilla wafers and granulated sugar until they become fine crumbs (about 20 seconds).
- Pour in the melted butter and pulse 4–6 times until the crumbs are evenly moistened.
- Alternatively: crush the wafers in a resealable bag using a rolling pin; then stir in sugar and melted butter in a bowl.
- Transfer the wet crumbs to the lined pan, press firmly into an even layer (use the flat bottom of a cup or your hands).
- Freeze this crust for 15 minutes to firm up.
3. Make the Custard Layer
- In a large bowl, whisk together the two pudding mix packets with 2 ½ cups of cold heavy cream. (It will thicken quickly.)
- Spread the pudding mixture over the chilled crust layer in an even layer.
- Chill in the refrigerator for at least 10 minutes. (Use this time to prepare the ganache.)
4. Make the Ganache
- Place the chopped semi‑sweet chocolate into a medium heatproof bowl.
- In a small saucepan, bring the ⅔ cup of heavy cream to a simmer (do not boil).
- Pour the hot cream over the chocolate and let sit for 1 minute.
- Whisk gently until the chocolate is fully melted and the ganache is smooth.
- Let it cool a bit—about 3 minutes for a smooth pour, or 5 minutes if you want to make decorative swoops.
5. Assemble & Chill
- Pour the ganache over the custard layer in an even sheet.
- If desired, use the back of a spoon or knife to create swooping patterns in the chocolate.
- Refrigerate until fully set—at least 2 hours (or overnight for firmer cuts).
- When ready, use the parchment overhangs to lift the slab from the pan.
- Place on a cutting board and slice into 12 or 16 squares. Wipe your knife between cuts for clean edges.
Helpful Tips

- Make sure your heavy cream is very cold when whisking with the pudding mix; this helps it thicken properly.
- Press the crust firmly and evenly so it doesn’t crumble when cutting.
- Chill times are essential—don’t rush them, or the layers may not set properly.
- Warm your knife under hot water, then dry and slice, wiping between cuts for neat bars.
- If the ganache seems too thick before pouring, give it a gentle whisk or short microwave burst (5 seconds) to loosen.
Substitutions And Variations
- Cookie base swap: Use graham crackers or digestive biscuits instead of vanilla wafers for a slightly nuttier base.
- Flavor twist: Stir in ½ teaspoon of vanilla extract or a splash of rum into the pudding mix for extra depth.
- Chocolate options: Swap semi‑sweet chocolate for milk or dark chocolate depending on your preference.
- Layer mix-ins: Add mini chocolate chips or toffee bits on top of the custard before pouring ganache.
- Individual servings: Use a mini loaf pan or dessert cups to make single-serve bars.
- Marble effect: Pour half the ganache, then swirl in white chocolate for a marbled top.
Storage Instructions
Keep the bars fresh by storing them in an airtight container in the refrigerator for up to three days.
Nutritional Information
(Estimate per bar; for 12 bars total)
- Calories: ~280
- Fat: ~18 g
- Saturated Fat: ~10 g
- Carbohydrates: ~25 g
- Sugars: ~18 g
- Protein: ~2 g
Note: Nutrition will vary depending on your exact brands and portion size.
Serving Suggestions
- Serve chilled, perhaps with a dusting of powdered sugar or a few fresh berries on top for contrast.
- Add a dollop of whipped cream on the side for extra decadence.
- Pair with coffee, a latte, or dessert wine to complement the creamy and chocolate flavors.
- These bars make great portable desserts for picnics, potlucks, or boxed lunches (keep chilled until serving).
Frequently Asked Questions About No‑Bake Boston Cream Pie Bars
Can I use homemade pudding instead of instant mix?
You can use homemade custard, but an instant pudding mix is incredibly convenient and gives a reliably firm texture. If substituting, ensure the homemade version is thick enough to hold shape when chilled.
What if the ganache is too runny or too firm?
If it’s too runny, let it cool a little more before pouring, or whisk in a bit more chocolate. If it’s too firm, warm gently (e.g. 5-second microwave bursts) and whisk to loosen.
Can this be made ahead?
Yes—make the bars the day before serving. The flavors meld beautifully overnight, and the texture remains excellent within the 3-day storage window.
Can I freeze them?
Freezing is tricky because the layers may separate or become icy. If you must, wrap tightly and freeze no longer than 1 month; thaw in refrigerator before serving.
How do I get clean slices?
Warm your knife under hot water, dry it, then slice in a single clean motion. Wipe between cuts. Using parchment overhangs makes lifting and slicing easier.
Can I scale the recipe up or down?
Yes—just maintain proportions and choose a corresponding pan size (for example, double for 9×13, or halve for a 6×6). Adjust chilling times accordingly.
Conclusion
Thank you so much for trying these No‑Bake Boston Cream Pie Bars! I hope you enjoy their rich vanilla custard layered on a crisp cookie base, topped with silky chocolate ganache. It’s one of my favorite desserts to make when I want something elegant with minimal effort. May your kitchen stay cool and your dessert be divine—thanks for being part of this food-loving community! Happy eating and happy baking (or non‑baking)!
Print
No‑Bake Boston Cream Pie Bars: A Decadent Dessert Without Turning on the Oven
- Prep Time: 25 minutes
- Cook Time: 0 minutes
- Total Time: 2 hours 25 minutes (includes chilling)
- Yield: 12–16 bars 1x
- Category: Dessert
Description
No-Bake Boston Cream Pie Bars feature a buttery vanilla wafer crust, creamy vanilla custard, and rich chocolate ganache topping—no oven needed!
Ingredients
Cooking spray
6 oz vanilla wafer cookies (about 50)
2 tbsp granulated sugar
6 tbsp unsalted butter, melted
2 (3.4 oz) boxes vanilla instant pudding mix
2½ cups cold heavy cream
6 oz semi-sweet chocolate (or 1 cup chips)
⅔ cup cold heavy cream
Instructions
1. Prepare the Pan
Line an 8×8‑inch square baking pan with parchment paper, leaving overhangs on two opposite sides (so you can lift out the slab later). Lightly mist the pan and parchment with cooking spray.
2. Make the Crust
- In a food processor, pulse the vanilla wafers and granulated sugar until they become fine crumbs (about 20 seconds).
- Pour in the melted butter and pulse 4–6 times until the crumbs are evenly moistened.
- Alternatively: crush the wafers in a resealable bag using a rolling pin; then stir in sugar and melted butter in a bowl.
- Transfer the wet crumbs to the lined pan, press firmly into an even layer (use the flat bottom of a cup or your hands).
- Freeze this crust for 15 minutes to firm up.
3. Make the Custard Layer
- In a large bowl, whisk together the two pudding mix packets with 2 ½ cups of cold heavy cream. (It will thicken quickly.)
- Spread the pudding mixture over the chilled crust layer in an even layer.
- Chill in the refrigerator for at least 10 minutes. (Use this time to prepare the ganache.)
4. Make the Ganache
- Place the chopped semi‑sweet chocolate into a medium heatproof bowl.
- In a small saucepan, bring the ⅔ cup of heavy cream to a simmer (do not boil).
- Pour the hot cream over the chocolate and let sit for 1 minute.
- Whisk gently until the chocolate is fully melted and the ganache is smooth.
- Let it cool a bit—about 3 minutes for a smooth pour, or 5 minutes if you want to make decorative swoops.
5. Assemble & Chill
- Pour the ganache over the custard layer in an even sheet.
- If desired, use the back of a spoon or knife to create swooping patterns in the chocolate.
- Refrigerate until fully set—at least 2 hours (or overnight for firmer cuts).
- When ready, use the parchment overhangs to lift the slab from the pan.
- Place on a cutting board and slice into 12 or 16 squares. Wipe your knife between cuts for clean edges.
Notes
For clean slices, warm and wipe your knife between cuts.
Store in an airtight container in the fridge for up to 3 days.
Recipe can be doubled for a 9×13 pan.
Nutrition
- Serving Size: 1 bar
- Calories: 280
- Sugar: 18g
- Carbohydrates: 25g
- Protein: 2g


