You know those cookies that disappear the second you put them on the platter? That’s exactly what happens with these Mint Chocolate Chip Snowball Cookies – they’re that good. I’ve been making this recipe for years, tweaking it until I got that perfect melt-in-your-mouth texture with just the right balance of cool mint and rich chocolate. Honestly, they’re so easy to whip up, you’ll wonder why you haven’t made them before. The secret? Quality butter (I’m picky about this), real mint extract, and that magical double dusting of powdered sugar that makes them look like little snow-covered treats. Trust me, one bite, and you’ll be hooked!

Why You’ll Love These Mint Chocolate Chip Snowball Cookies
Listen, I don’t blame you if you eat half the batch before they even make it to the cooling rack – these cookies are that addictive! Here’s why they’ve become my go-to holiday treat:
- Super simple – just mix, chill, and bake (no fancy equipment needed!)
- Foolproof texture – that perfect crumbly-yet-melt-in-your-mouth quality every time
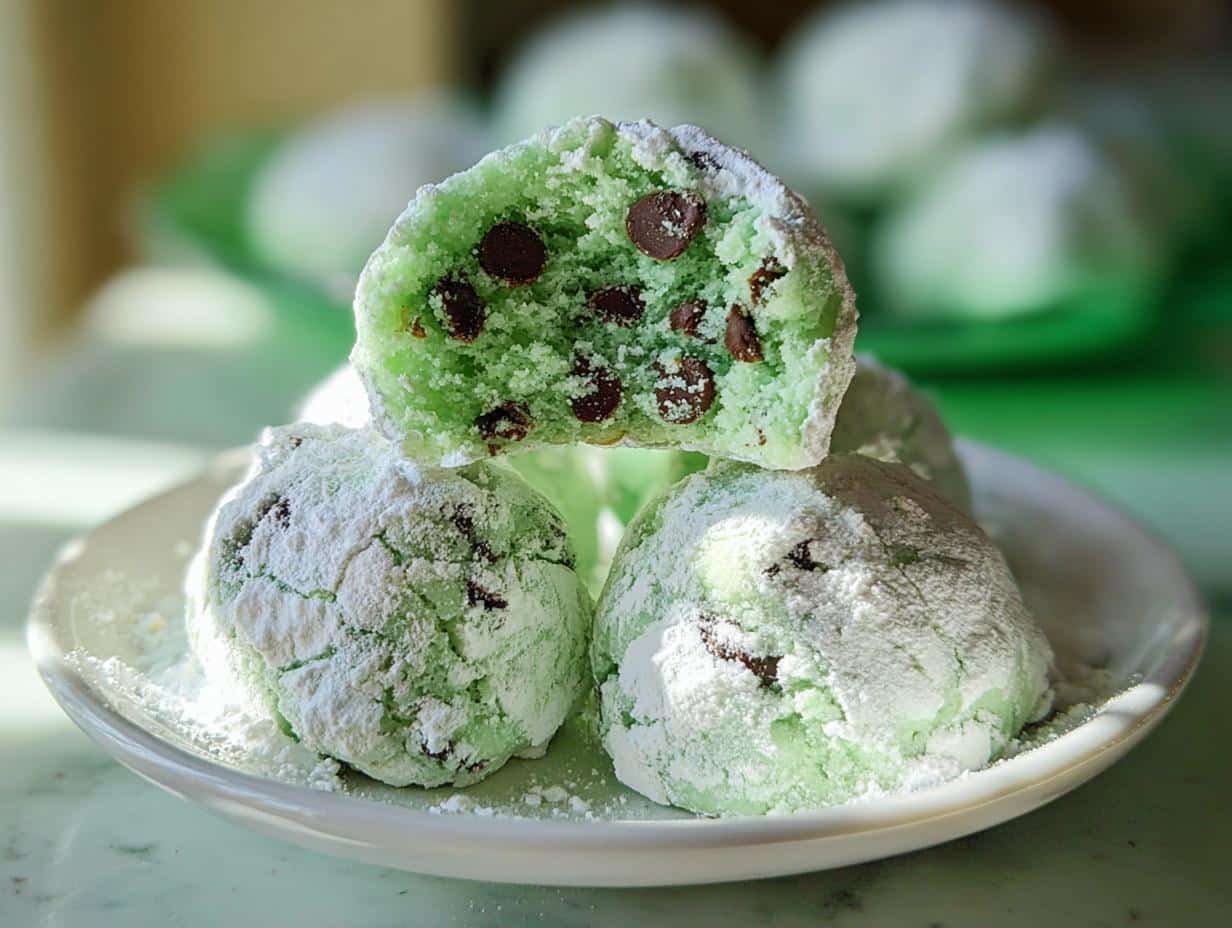
- Festive magic – the green tint and snowy sugar coating make them look straight out of a winter wonderland
- Mint-chocolate perfection – like your favorite ice cream in cookie form
Perfect for Holiday Gifting
These little snowballs practically scream “holiday cheer!” I love packing them in cute tins with tissue paper – the powdered sugar coating keeps them looking picture-perfect, and that minty aroma when you open the lid? Absolute magic. They’re always the first cookies to disappear at cookie swaps!
Ingredients for Mint Chocolate Chip Snowball Cookies
Okay, let’s talk ingredients – but first, a quick PSA: measure your flour correctly (spoon it into the cup and level it off, no packing!) or you’ll end up with hockey pucks instead of delicate snowballs. Here’s what you’ll need:
- 1 cup unsalted butter – softened (leave it out for 30 minutes, no cheating with the microwave!)
- ⅔ cup powdered sugar – sifted (lumps are the enemy here)
- 2 ¼ cups all-purpose flour – spooned and leveled like I just ranted about
- ½ teaspoon salt – trust me, it makes the mint pop
- 1 teaspoon mint extract – the good stuff, not that artificial nonsense
- Green gel food coloring – just enough for that festive hint of color
- ¾ cup mini chocolate chips – regular chips will make your snowballs lumpy
- Extra powdered sugar – for that blizzard effect coating

Ingredient Substitutions & Tips
No mint extract? Peppermint works in a pinch (use ¾ tsp – it’s stronger!). Want natural color? Spinach powder works shockingly well. Whatever you do, avoid liquid food coloring – it turns your dough sticky and sad. And please, for the love of cookies, don’t skip the chilling step!
How to Make Mint Chocolate Chip Snowball Cookies
Alright, let’s make some magic happen! These cookies come together so easily, but there are a few key steps that make all the difference between “good” and “oh-my-goodness-I-need-another-one” amazing.
Step 1: Cream Butter and Sugar
First things first – beat that softened butter and powdered sugar together until the mixture turns light and fluffy. I mean really fluffy – like pale yellow clouds! This takes about 2-3 minutes with a hand mixer. The air you incorporate here gives the cookies that perfect melt-in-your-mouth texture.
Step 2: Add Dry Ingredients and Color
Now gently mix in the flour and salt – just until combined. Overmixing = tough cookies, and we don’t want that! Add your mint extract and green food coloring (gel works best) a few drops at a time until you get that perfect minty green hue. Fold in those mini chocolate chips last – they’re like little flavor surprises in every bite.
Step 3: Chill and Bake
Here’s the step impatient bakers (like me!) always want to skip – but don’t! Refrigerate the dough for at least 30 minutes. This lets the butter firm up so your cookies keep their perfect round shape instead of spreading into sad pancakes. Bake at 375°F for just 7-8 minutes – you want them barely golden on the bottom but still soft in the middle.
Step 4: Double Coat with Powdered Sugar
The snowball magic happens here! After cooling for 5 minutes, gently roll the warm cookies in powdered sugar. Let them cool completely, then give them another sugar bath. This double coating creates that beautiful snowy finish that makes everyone go “ooh!” when they see them.
Tips for Perfect Mint Chocolate Chip Snowball Cookies
Listen, I’ve made these cookies enough times to learn all the tricks! First – use a small cookie scoop (about 1 tablespoon) for perfectly uniform snowballs. No eyeballing it or you’ll get mismatched sizes (ask me how I know). And for Pete’s sake, check your oven temp with a thermometer! A few degrees too hot and your cookies will spread. Store them in an airtight container with parchment between layers – they’ll stay fresh and powdery for days. Pro tip: Hide a few for yourself before serving – these disappear fast!
Storing and Freezing Mint Chocolate Chip Snowball Cookies
These precious little snowballs actually get even better after a day or two! Just keep them in an airtight container at room temperature – I like to layer them with parchment paper so they don’t stick together. Need to stash some away? They freeze beautifully for up to 3 months. Just pop them in a freezer bag, squeeze out all the air, and thaw at room temperature when the craving hits. A quick roll in fresh powdered sugar after thawing makes them look brand new!
Nutrition Information for Mint Chocolate Chip Snowball Cookies
Okay, let’s be real – we’re not eating these for their health benefits! But if you’re curious, each little snowball cookie clocks in around 122 calories. Remember, these are estimates – your exact numbers will vary based on ingredient brands and how generously you coat them in powdered sugar (no judgment here!). The mint gives you that refreshing zing, and the mini chocolate chips? Well, those are basically happiness in tiny morsels.
FAQs About Mint Chocolate Chip Snowball Cookies
Q1. Can I use regular chocolate chips instead of mini chips?
Nope, don’t do it! Regular chips will make your snowballs lumpy and uneven. The mini chips distribute perfectly throughout the dough so every bite gets that mint-chocolate magic. Trust me, I learned this the hard way!
Q2. How long do these cookies stay fresh?
They’ll keep their perfect texture for about 4 days in an airtight container. But let’s be honest – they never last that long in my house! The powdered sugar coating helps preserve their moisture too.
Q3. My dough seems too dry – what did I do wrong?
You probably packed your flour instead of spooning and leveling it. Next time, try adding a teaspoon of milk to bring it together. And remember – the dough should be slightly crumbly before chilling!
Q4. Can I freeze the dough instead of baked cookies?
Absolutely! Roll the dough into balls first, freeze on a tray, then transfer to a bag. When ready to bake, just add 1-2 minutes to the baking time. No need to thaw – frozen dough holds its shape even better!
Q5. Why did my cookies spread too much?
Three likely culprits: butter was too soft, dough wasn’t chilled enough, or oven was too cold. My golden rule? If you can leave a fingerprint in the dough when you press it, it needs more fridge time!
Share Your Mint Chocolate Chip Snowball Cookies
Did you make these little minty wonders? I’d love to see! Snap a pic and tag me – nothing makes me happier than seeing your snowy cookie creations. Leave a rating below too – your feedback helps other bakers find this recipe!
Print
Mint Chocolate Chip Snowball Cookies in 4 Essential Steps
- Prep Time: 10 minutes
- Cook Time: 8 minutes
- Total Time: 18 minutes
- Yield: 30 cookies 1x
- Category: Dessert
- Method: Baking
- Cuisine: American
- Diet: Vegetarian
Description
Melt in your mouth Mint Chocolate Chip Snowball Cookies are a treat you won’t be able to resist. So easy to make and packed with mint and chocolate flavor – no one can eat just one.
Ingredients
- 1 cup unsalted butter, softened
- ⅔ cup powdered sugar, sifted
- 2 ¼ cups all-purpose flour, spooned and leveled
- ½ teaspoon salt
- 1 teaspoon mint extract or peppermint extract
- Green food coloring (gel food color works best)
- ¾ cup mini chocolate chips
- Additional powdered sugar for coating
Instructions
- Line a large cookie sheet with parchment paper and set aside.
- Beat the butter and powdered sugar together until light and fluffy.
- Mix in the flour, salt, and extract just until combined.
- Add the green food color a few drops at a time until your desired color is achieved.
- Stir in mini chocolate chips.
- Scoop out one tablespoon of dough at a time and form into a ball. Place balls on the prepared cookie sheet.
- Cover and refrigerate dough for at least 30 minutes.
- Preheat oven to 375°F.
- Bake cookies for 7 to 8 minutes. Do not let them brown too much on the bottom. Let cool for 5 minutes on the cookie sheet.
- Line another large baking sheet with parchment paper and dust liberally with powdered sugar. Place the slightly cooled cookies on this baking sheet and dust with additional powdered sugar.
- Let cookies cool completely.
- Fill a small bowl halfway with powdered sugar. Drop cookies one at a time into the bowl and turn until coated in powdered sugar.
- Store leftovers in an airtight container for up to four days.
Notes
- Gel food coloring works best for vibrant color.
- Refrigeration is essential for the dough to hold its shape.
- Do not overbake to maintain a soft texture.
Nutrition
- Serving Size: 1 cookie
- Calories: 122 kcal
- Sugar: 7g
- Sodium: 40mg
- Fat: 7g
- Saturated Fat: 4g
- Unsaturated Fat: 2g
- Trans Fat: 0g
- Carbohydrates: 14g
- Fiber: 0.5g
- Protein: 1g
- Cholesterol: 16mg


