Halloween Spider Cookies are a spooky and sweet treat that bring both fright and delight to your holiday festivities. Perfect for parties, school events, or a fun family baking session, these cookies are as adorable as they are delicious. Featuring rich peanut butter flavor and topped with a miniature Reese’s cup spider, they’re easy to make with a boxed cake mix and simple decorations. If you’re looking for a no-fuss Halloween dessert that will impress both kids and adults, this recipe is just what you need. Let’s dive into this festive baking fun!
Why You’ll Love This Halloween Spider Cookies Recipe
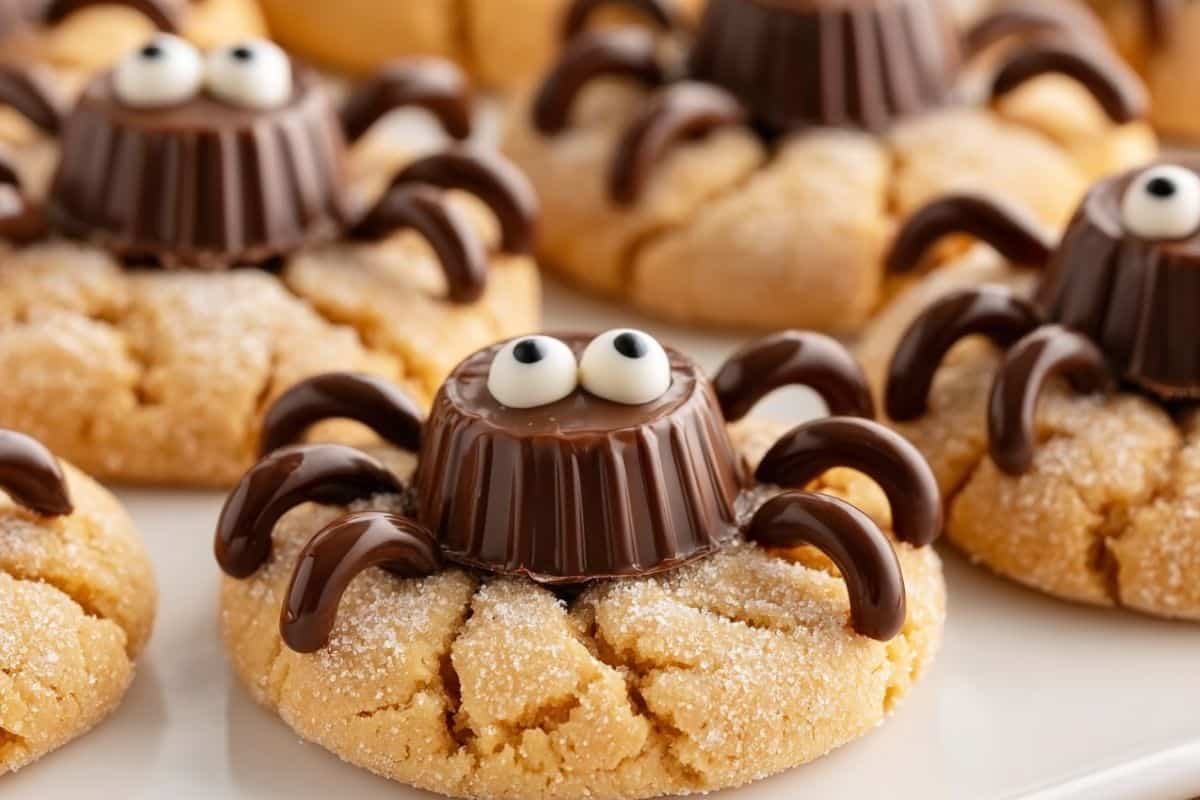
These cookies combine the best of peanut butter and chocolate into a fun and festive Halloween treat. The use of cake mix makes the dough incredibly easy to whip up, and the Reese’s cup spiders give each cookie a playful, spooky twist. They are soft, chewy, and full of flavor. Plus, decorating them is a fun activity for kids and adults alike. Whether you’re hosting a Halloween bash or just looking for a sweet snack to celebrate the season, these cookies are sure to be a hit.
Ingredients
- 1 cup creamy peanut butter (use a no-stir variety like Jif or Skippy)
- 2 large eggs
- 1/2 cup vegetable or canola oil
- 1 (15.25-ounce) box yellow cake mix (such as Duncan Hines)
- 1/3 cup granulated sugar
- 28 miniature Reese’s peanut butter cups, unwrapped
- 1/3 cup semi-sweet chocolate chips
- 56 candy eyeballs
Step-by-Step: How to Make Halloween Spider Cookies
- Set your oven to 350°F and prepare two baking sheets by lining them with parchment paper.
- In a large mixing bowl, stir together the peanut butter, eggs, oil, and cake mix until a thick dough forms.
- Use a 2-tablespoon cookie scoop to portion the dough. Roll each dough ball in granulated sugar and place on the prepared baking sheets about 2 inches apart.
- Bake for 9 to 11 minutes, until the edges are set and the tops appear dry.
- Immediately press a mini Reese’s peanut butter cup into the center of each cookie as soon as they come out of the oven.
- Let the cookies cool completely on the baking sheet to help the peanut butter cup set.
- Melt the chocolate chips and transfer the melted chocolate into a piping bag fitted with a small round tip, or use a zip-top bag with a tiny corner snipped off.
- Pipe four legs on each side of the Reese’s cup to form spider legs.
- Dab a small amount of melted chocolate on the back of each candy eyeball and press two onto the top of each Reese’s to complete the spider face.
- Let the chocolate decorations set before serving or storing.
Helpful Tips

- Make sure to use a no-stir peanut butter to achieve the best dough texture.
- Press the Reese’s cups in while cookies are still hot so they adhere well.
- Cool cookies completely before decorating to avoid melting the candy eyeballs.
- Practice piping on parchment paper if you’re new to decorating.
- Let kids help place the candy eyeballs for some family fun.
Substitutions And Variations
- Use chocolate cake mix instead of yellow for a richer flavor and darker cookie base.
- Swap peanut butter cups with chocolate truffles or malted milk balls for a different spider body.
- Add a drop of food coloring to the dough to create colorful Halloween themes.
- Substitute peanut butter with almond butter or sunflower seed butter for allergy-friendly options.
- Try mini chocolate chips in the dough for extra chocolaty cookies.
Storage Instructions
Store the cookies in an airtight container at room temperature for up to 5 days. Place a piece of parchment or wax paper between layers to keep decorations intact. For longer storage, freeze the cookies in a single layer until solid, then transfer to a freezer-safe container with parchment between layers. Add candy eyeballs after thawing to avoid moisture issues.
Nutritional Information
- Calories: 215 kcal
- Carbohydrates: 24g
- Protein: 4g
- Fat: 12g
- Saturated Fat: 3g
- Polyunsaturated Fat: 4g
- Monounsaturated Fat: 5g
- Trans Fat: 0.1g
- Cholesterol: 14mg
- Sodium: 182mg
- Potassium: 100mg
- Fiber: 1g
- Sugar: 15g
- Vitamin A: 24IU
- Vitamin C: 0.02mg
- Calcium: 46mg
- Iron: 1mg
Serving Suggestions
Serve these cookies as a centerpiece for your Halloween dessert table. Pair with spooky punch or hot cocoa for a cozy treat. They also make great party favors when packaged in clear treat bags tied with festive ribbons. Add them to a Halloween charcuterie board with candy corn, caramel popcorn, and gummy worms for a complete themed spread.
Frequently Asked Questions About Halloween Spider Cookies
Can I make these cookies ahead of time? Yes, you can bake them a day or two in advance. Just store in an airtight container and add candy eyeballs the day of serving for the best look.
Can I use a different type of cake mix? Absolutely! Chocolate or spice cake mixes work well too, just be mindful of any changes in dough texture.
What if I don’t have a piping bag? Use a zip-top bag and snip a tiny piece from one corner for a DIY piping tool.
Are there nut-free alternatives? Yes, use sunflower seed butter and a nut-free chocolate candy for a similar look and taste.
Do the decorations stay in place during storage? As long as the cookies are fully cooled and stored with care, the decorations should stay intact.
Conclusion
Thank you so much for trying out this Halloween Spider Cookies recipe! I absolutely love making these cookies every spooky season because they’re such a fun combination of easy prep, rich peanut butter flavor, and playful decoration. Whether you’re baking with kids, prepping for a party, or simply getting into the Halloween spirit, this recipe is a guaranteed crowd-pleaser. I hope you enjoy every bite and have a blast bringing these cookie spiders to life. Happy baking and have a frightfully delicious Halloween!
Print
Halloween Spider Cookies Recipe
- Prep Time: 15 minutes
- Cook Time: 10 minutes
- Total Time: 25 minutes
- Yield: 28 cookies 1x
- Category: Dessert
Description
These Halloween Spider Cookies are an easy, kid-friendly treat made with peanut butter, yellow cake mix, and decorated with chocolate and candy eyes. They’re spooky, sweet, and perfect for parties or a fun fall baking activity.
Ingredients
1 cup creamy peanut butter (no-stir, like Jif or Skippy)
2 large eggs
1/2 cup vegetable or canola oil
1 (15.25 oz) box yellow cake mix (e.g., Duncan Hines)
1/3 cup granulated sugar
28 mini Reese’s peanut butter cups, unwrapped
1/3 cup semi-sweet chocolate chips
56 candy eyeballs
Instructions
- Set your oven to 350°F and prepare two baking sheets by lining them with parchment paper.
- In a large mixing bowl, stir together the peanut butter, eggs, oil, and cake mix until a thick dough forms.
- Use a 2-tablespoon cookie scoop to portion the dough. Roll each dough ball in granulated sugar and place on the prepared baking sheets about 2 inches apart.
- Bake for 9 to 11 minutes, until the edges are set and the tops appear dry.
- Immediately press a mini Reese’s peanut butter cup into the center of each cookie as soon as they come out of the oven.
- Let the cookies cool completely on the baking sheet to help the peanut butter cup set.
- Melt the chocolate chips and transfer the melted chocolate into a piping bag fitted with a small round tip, or use a zip-top bag with a tiny corner snipped off.
- Pipe four legs on each side of the Reese’s cup to form spider legs.
- Dab a small amount of melted chocolate on the back of each candy eyeball and press two onto the top of each Reese’s to complete the spider face.
- Let the chocolate decorations set before serving or storing
Notes
Store in an airtight container for up to 5 days.
Freeze up to 3 months without candy eyes (add after thawing).
If using a 13.25 oz cake mix, reduce oil to 1/3 cup and peanut butter to 3/4 cup + 1 tbsp.
Nutrition
- Serving Size: 1 cookie
- Calories: 215
- Sugar: 15g
- Carbohydrates: 24g
- Protein: 4g


