Nothing screams holiday spirit like a tray of adorable, festive desserts—and these Grinch mini cheesecakes are my absolute favorite way to spread some cheer. Every year, my kitchen turns into a chaotic holiday baking zone, with cookie cutters scattered everywhere and way too much green food dye on my fingers. But these little cheesecakes? They’re the stars of the show—easy to make, totally irresistible, and guaranteed to make even the grumpiest holiday guest crack a smile.
I first stumbled upon this recipe when I needed something cute but foolproof for a last-minute Christmas party, and let me tell you, they were gone before the eggnog was even poured. The Oreo crust adds that perfect chocolatey crunch, while the bright green filling (just like the Grinch himself!) is creamy, tangy, and just sweet enough. Plus, they’re miniature, which basically means you can eat three without guilt—right?

Why You’ll Love These Grinch Mini Cheesecakes
These adorable little desserts aren’t just cute—they’re downright magical. Here’s why they’ll become your new holiday staple:
- Festive AF: That vibrant green color? Instant holiday cheer on a plate. They look like they belong in Whoville!
- Easier than untangling Christmas lights: The Oreo crust doesn’t even need baking—just mix, press, and you’re halfway done.
- Party perfect: Individual servings mean no slicing mess, and they fit perfectly on dessert tables between the cookies and fudge.
- Kid-friendly fun: Little helpers love squishing the crust and watching the filling turn Grinch-green (just maybe keep the food coloring away from their clothes).
- Make-ahead magic: They actually taste better after chilling, so you can cross desserts off your to-do list early.
Trust me, these disappear faster than presents on Christmas morning!
Ingredients for Grinch Mini Cheesecakes
Gather these simple ingredients – you might already have most in your pantry! The magic happens with just:
- 1 cup Oreo crumbs (from 10-11 Oreos – yes, I’ve counted!)
- 2½ tbsp butter, melted (salted or unsalted both work here)
- 2 (8 oz) packages cream cheese, softened (don’t skip the softening!)
- ½ cup granulated sugar (I’ve tried brown sugar too – stick with white here)
- 2 large eggs (room temp blends smoother)
- 1 tsp pure vanilla extract (the good stuff makes a difference)
- Neon green food coloring (I’ll tell you why gel is best below)
Ingredient Notes & Substitutions
Baking should be fun, not stressful! If you need swaps: gluten-free Oreos work beautifully, and vegan cream cheese can substitute in a pinch. For natural color, try spinach powder (but the green won’t be as vibrant). Here’s my secret – neon green gel food coloring gives that perfect Grinch hue without thinning the batter like liquid versions. And if you’re out of vanilla? A tiny pinch of cinnamon adds cozy holiday warmth instead.

How to Make Grinch Mini Cheesecakes
Okay, let’s make some magic happen! These mini cheesecakes come together so easily, you’ll feel like you’ve tricked the baking gods. First things first – preheat that oven to 350°F (175°C). Trust me, I’ve forgotten this step before and ended up with sad, half-baked middles. Line your cupcake pan with those cute liners – holiday-themed ones if you’re feeling extra festive!
Step 1: The Crust That’ll Make You Swoon
Pulse those Oreos in your food processor until they’re fine crumbs (about 10-11 cookies). No processor? No problem! Toss ’em in a bag and go to town with a rolling pin – great stress relief! Mix in the melted butter until it looks like wet sand. Now here’s the key – really press that mixture firmly into each liner. I use the bottom of a shot glass to pack it down tight (and maybe sneak a sip of eggnog while I’m at it).
Step 2: The Creamy Green Goodness
Beat that softened cream cheese until it’s completely smooth – no lumps allowed! Add sugar and beat until fluffy. Now the eggs go in one at a time, followed by the vanilla. Here comes the fun part – add that neon green food coloring bit by bit until you get that perfect Grinch green. My kids love helping with this part, though our counter usually ends up looking like a Smurf exploded.
Step 3: Bake & The Waiting Game
Spoon about ¼ cup of filling into each crust-filled liner. Pop them in the oven for 15-17 minutes – the centers should still have a slight jiggle when you nudge the pan. Let them cool completely in the pan (patience, grasshopper!), then transfer to the fridge for at least 2 hours to set. I know it’s hard to wait, but trust me – that chilling time makes all the difference!
Tips for Perfect Grinch Mini Cheesecakes
Here are my hard-earned secrets for flawless cheesecakes every time: First, make sure that cream cheese is really softened – I leave mine out for 2 hours. Second, use gel food coloring – liquid makes the batter too runny. After filling the cups, gently tap the pan on the counter to release air bubbles. And here’s my favorite trick – run a knife around the edges after baking to prevent sticking as they cool. Oh, and resist the urge to peek in the fridge every 5 minutes – they need that full chilling time to set up perfectly!
Serving & Storing Grinch Mini Cheesecakes
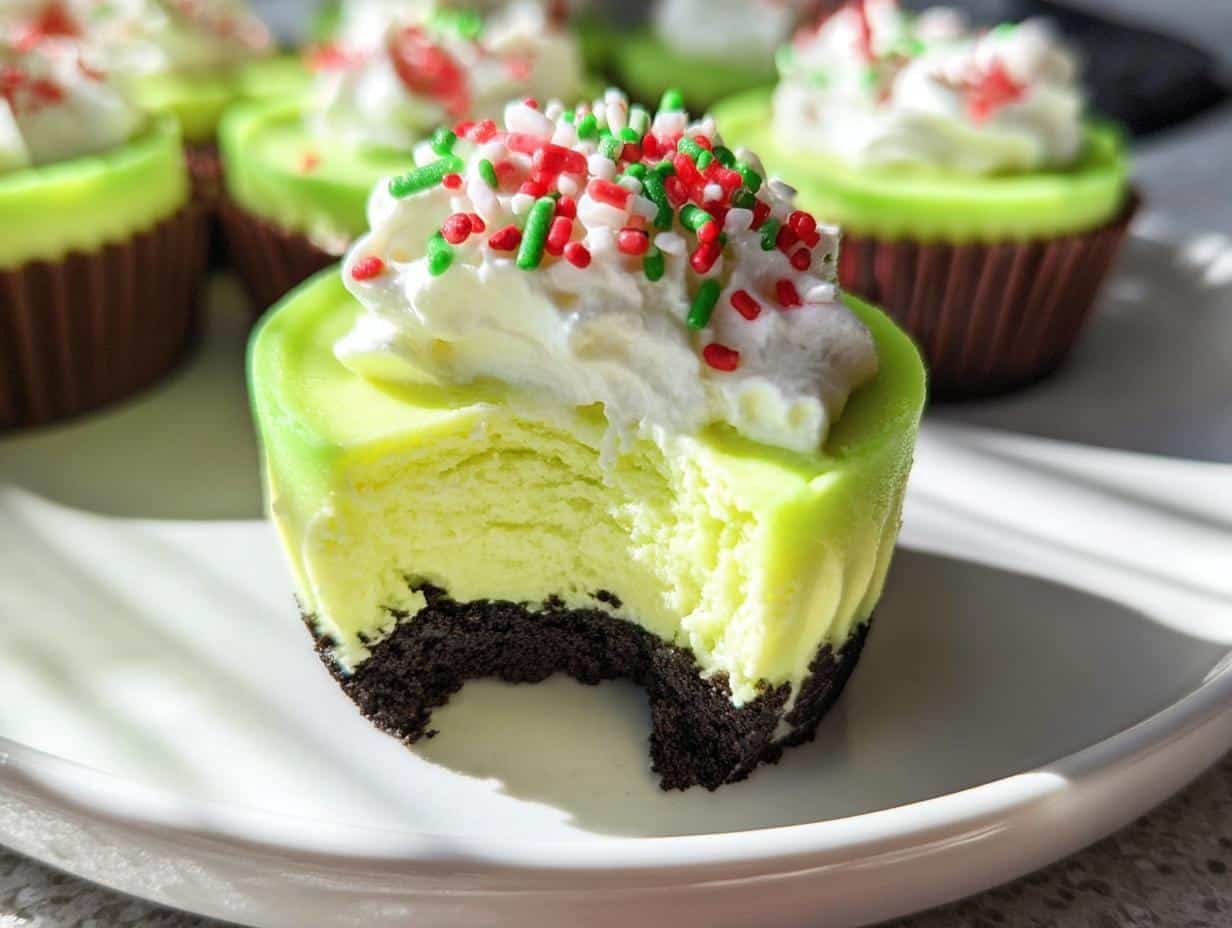
Now for the best part – dressing up your Grinchy masterpieces! I love piping little swirls of whipped cream on top (like his mischievous hair) and adding red sprinkles for that iconic Santa-hat red. They’re perfect straight from the fridge – no reheating needed. Store leftovers (if you have any!) in an airtight container for up to 3 days. Want to get ahead? These freeze beautifully for up to a month – just thaw overnight in the fridge before serving.

Grinch Mini Cheesecakes FAQ
Can I make these ahead of time? Absolutely! These little guys actually taste even better after chilling overnight. Just pop them in the fridge after baking (covered with plastic wrap) and they’ll be party-ready when you are. The flavors meld together beautifully with time.
Can I use regular liquid food coloring? You can, but trust me on this – gel coloring works so much better! Liquid coloring makes the batter thinner and you’ll need way more to get that perfect Grinch green. With gel, just a tiny drop gives vibrant color without changing the texture. I learned this the hard way after ending up with minty soup instead of cheesecake batter!
How do I prevent cracks in my cheesecakes? Two words: don’t overbake! Those slightly jiggly centers are what you want. Also, let them cool gradually in the oven with the door cracked open for 10 minutes before removing. And always, always refrigerate them properly – it’s the secret to that perfect creamy texture without cracks.
Nutritional Information
Just so you know what you’re biting into (because let’s be real – you’ll probably eat two!), here’s the scoop per mini cheesecake: About 180 calories, 12g fat, and 16g carbs. Of course, these numbers might wiggle a bit depending on your exact ingredients – but who’s counting during the holidays anyway?
Share Your Grinch Mini Cheesecakes
I’d love to see your Grinchy creations! Tag me on Instagram when you make these—nothing makes me happier than seeing your holiday baking adventures. And if you try this recipe, leave a rating so others know how delicious they are!
Print
25 Irresistible Grinch Mini Cheesecakes for Christmas Magic
- Prep Time: 20 minutes
- Cook Time: 17 minutes
- Total Time: 37 minutes
- Yield: 12 mini cheesecakes 1x
- Category: Dessert
- Method: Baking
- Cuisine: American
- Diet: Vegetarian
Description
Mini cheesecakes with an Oreo crust and green-colored filling, perfect for a Grinch-themed dessert.
Ingredients
- 1 cup Oreo crumbs
- 2 1/2 tbsp butter, melted
- 2 (8 oz) cream cheese, softened
- 1/2 cup sugar
- 2 eggs
- 1 tsp vanilla
- Neon green food coloring
Instructions
- Preheat oven to 350°F (175°C). Line a cupcake pan with liners.
- Pulse 10-11 Oreos in a food processor to make crumbs. Mix in melted butter.
- Divide crumbs evenly between liners and press down firmly.
- Beat cream cheese and sugar until smooth. Add eggs and vanilla.
- Mix in neon green food coloring until desired color is reached.
- Spoon 1/4 cup filling into each cup.
- Bake for 15-17 minutes. Centers should be slightly jiggly.
- Cool completely in pan, then refrigerate until firm.
- Top with whipped cream and sprinkles if desired.
Notes
- Let cream cheese soften at room temperature for easier mixing.
- Use neon green gel food coloring for vibrant color.
- Refrigerate for at least 2 hours for best texture.
Nutrition
- Serving Size: 1 mini cheesecake
- Calories: 180
- Sugar: 14g
- Sodium: 150mg
- Fat: 12g
- Saturated Fat: 6g
- Unsaturated Fat: 4g
- Trans Fat: 0g
- Carbohydrates: 16g
- Fiber: 0.5g
- Protein: 3g
- Cholesterol: 55mg


