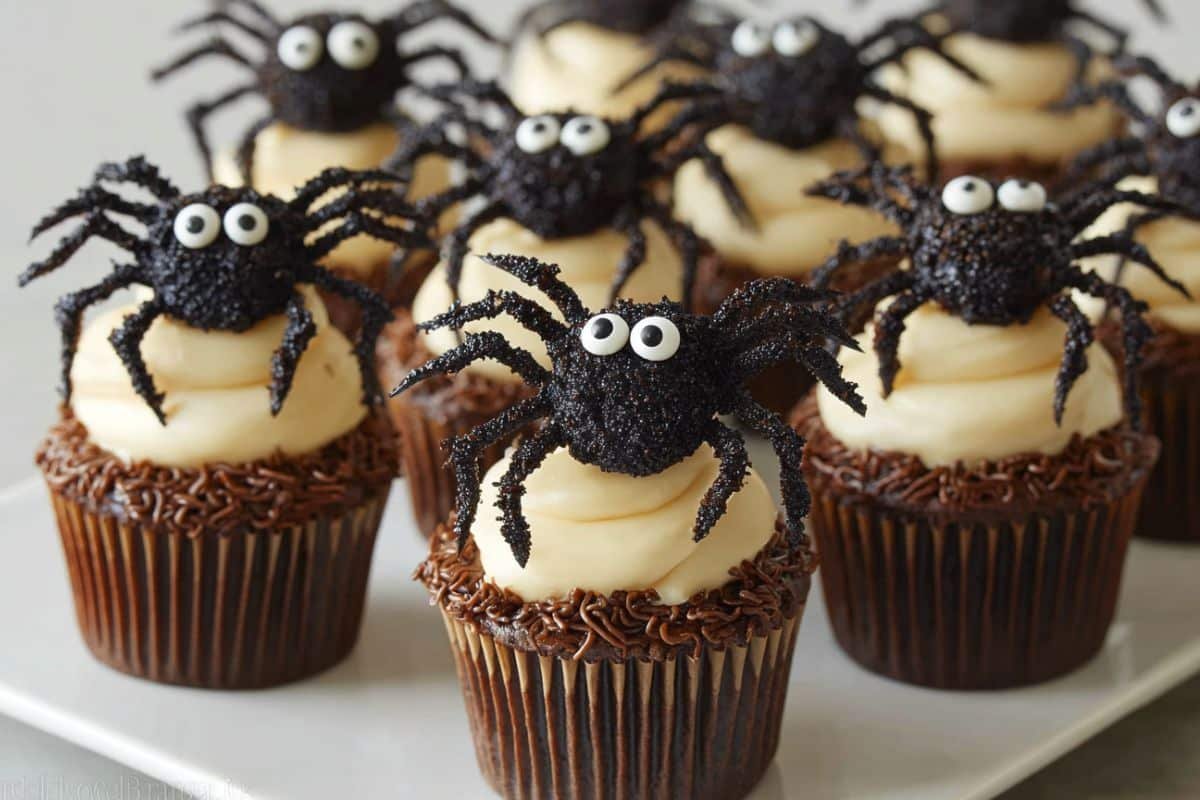
Easy Spider Cupcakes are the perfect blend of spooky fun and delicious chocolatey goodness—ideal for Halloween parties, themed birthday celebrations, or whenever you want to surprise someone with something delightfully creepy and cute. These moist chocolate cupcakes, topped with buttercream and standing over their own little spider decorations, are surprisingly simple to make and impress both kids and adults alike. With one boxed cake mix, instant pudding, tender sour cream, and a rich buttercream, you’ll whip them together in under an hour (excluding cooling). If you’re ready for a recipe that’s festive, fun, and totally indulgent, these Easy Spider Cupcakes are your new go‑to dessert.
Why You’ll Love This Recipe
- Fun & Festive Decoration: The little chocolate spiders—complete with candy eyes—transform ordinary cupcakes into something whimsical and memorable.
- Super Moist Texture: Thanks to the cake mix, instant pudding, and sour cream, these cupcakes stay tender and moist long after baking.
- Customizable Design: Use colored candy melts or different decorations to change the theme from spiders to anything you like (ghosts, monsters, etc.).
- Easy Prep: Uses common pantry items; the frosting is simple, and the spider decorations don’t require advanced skills—just a piping bag and some patience.
- Perfect for Parties or Gifting: They’re cute, shareable, and a great conversation starter at holidays or celebrations.
Ingredients
Here’s everything you’ll need to make these cupcakes and the spooky spider toppers:
For the cupcakes:
- 1 (15.25 oz.) box Devil’s Food cake mix
- 1 (3.9 oz.) box instant chocolate pudding mix
- 1 cup sour cream
- ½ cup water
- ½ cup vegetable oil
- 4 large eggs
For the frosting and decorations:
- 1 cup unsalted butter, softened
- 2 teaspoons vanilla extract
- 2 Tablespoons heavy cream
- 3 cups confectioners’ sugar, sifted
- 2 cups chocolate melting wafers or chocolate chips
- Chocolate sprinkles
- Candy eyes
Step‑by‑Step: How to Make Easy Spider Cupcakes
1. Preheat & Prep
Preheat your oven to 350°F (175°C). Line two standard muffin pans with cupcake liners (about 24‰26 liners depending on size).
2. Mix the Cupcake Batter
In a large bowl, or your stand mixer fitted with the paddle attachment, combine:
- Devil’s Food cake mix
- Instant chocolate pudding mix
- Sour cream
- Water
- Vegetable oil
- Eggs
Beat on medium speed until the batter is smooth and all ingredients are fully incorporated, scraping down the sides of the bowl as needed.
3. Bake the Cupcakes
Divide the batter evenly between the cupcake liners. Bake for 18–22 minutes, or until a toothpick inserted into the center of a cupcake comes out clean (little moist crumbs are okay, but no raw batter). Once done, let the cupcakes rest in the pan for about 5 minutes, then transfer to a wire rack to cool completely.
4. Make the Buttercream Frosting
In a clean mixing bowl, cream the softened butter until it’s smooth and fluffy. Add vanilla extract. Gradually add half of the sifted confectioners’ sugar and beat until combined, scraping the bowl as needed.
Next, add the heavy cream and the remaining confectioners’ sugar, and beat again until the frosting is thick, creamy, and spreadable. If the frosting seems too thick, add a little more cream (½ teaspoon at a time); if too thin, add more sifted sugar.
5. Create the Chocolate Spiders
- Line a baking sheet with wax paper.
- Melt the chocolate melting wafers (or chips) according to package instructions.
- Transfer melted chocolate to a piping bag or a sealable plastic bag, snipping off a small corner.
- Pipe out spider bodies and heads, then pipe on legs to create spider shapes. Add chocolate sprinkles while the chocolate is still warm to give texture (e.g. fuzzy or hairy look).
- Place candy eyes on the spider faces.
- Let the spiders set and fully harden at room temperature (or speed up in the fridge if needed).
6. Assemble Cupcakes
Once cupcakes are completely cool, frost them with the buttercream using an offset spatula or piping bag (if you prefer decorative piping). Carefully peel the hardened chocolate spiders off the wax paper and place one atop each frosted cupcake.
Helpful Tips

- Room Temperature Ingredients: Butter, sour cream, and eggs should be at room temperature to ensure smooth mixing and no lumps.
- Don’t Overmix: Once you’ve added the eggs and sour cream, blend just until combined; overmixing can lead to tougher cupcakes.
- Proper Cooling: Frosting on warm cupcakes will melt. Wait until they are completely cool before frosting and placing spiders.
- Smoothing Frosting: For a polished look, dip your offset spatula in hot water, shake off excess, and smooth the frosting in single strokes.
- Spider Details: If you struggle piping legs in one go, pipe in segments. Use a thin tip or tiny snip for fine lines.
Substitutions And Variations
- Cake Mix Swap: Use a chocolate fudge cake mix if you want richer flavor; or even a red velvet box mix with cocoa powder for a color twist.
- Pudding Flavor Alternate: Vanilla or chocolate instant pudding works; for more adventurous flavor, try caramel if mixing with chocolate.
- Buttercream Flavors: Swap vanilla for almond, orange, or coffee extract to pair interestingly with chocolate.
- Spider Color Variations: Use colored candy melts (white, orange, green) to match a theme; decorate spiders with edible glitter or colored sanding sugar.
- Frosting Options: Instead of buttercream, use chocolate ganache for frosting—or a cream cheese frosting if desired, though less stable in heat.
Storage Instructions
- Room Temperature: Store cupcakes in an airtight container at room temperature for up to 2 days; keep them away from direct sun or heat to prevent frosting from melting.
- Refrigeration: If your kitchen is warm, refrigerate in an airtight container. Let cupcakes return to room temperature before serving for best texture and flavor (especially buttercream).
- Freezing: You can freeze unfrosted cupcakes. Once cooled, wrap individually in plastic wrap, then freeze in a zip‑top bag or container. Thaw completely before frosting and decorating. Frosted cupcakes are best eaten fresh but can be frozen carefully with firm frosting and decorations, though texture may suffer a bit.
Nutritional Information
Approximately per cupcake (one standard‑sized, including frosting and spider decoration):
| Nutrient | Amount |
|---|---|
| Calories | ~ 294 kcal |
| Carbohydrates | ~ 38 g |
| Protein | ~ 2 g |
| Fat | ~ 15 g |
| Saturated Fat | ~ 8 g |
| Cholesterol | ~ 51 mg |
| Sodium | ~ 171 mg |
| Potassium | ~ 71 mg |
| Sugar | ~ 31 g |
| Vitamin A | ~ 330 IU |
| Vitamin C | ~ 0.1 mg |
| Calcium | ~ 52 mg |
| Iron | ~ 1.1 mg |
Note: These are estimates and can vary based on brands used, size of cupcake, and exact amounts of frosting or decorations.
Serving Suggestions
- Display on a tiered cupcake stand for a Halloween party or dessert table.
- Pair with vanilla ice cream or a scoop of spooky‐colored sorbet (purple or orange) for contrast.
- Serve with a hot cup of milk, coffee, or spiced cider—chocolate and warm drinks always go hand in hand.
- Garnish with a dusting of cocoa powder or edible glitter around the base for extra flair.
Frequently Asked Questions About Easy Spider Cupcakes
Q: Can I make these cupcakes ahead of time?
Yes, you can bake the cupcakes a day or two ahead. Keep them in an airtight container at room temperature in a cool place. Frost them just before serving or if frosted earlier, store with care so the frosting and decorations stay intact.
Q: How do I avoid flat or sunken cupcakes?
Make sure your baking powder in the cake mix is fresh, don’t overfill the liners (fill about ⅔ full), and avoid opening the oven door early. Also, room‐temperature eggs help the structure bake evenly.
Q: What if the frosting is too runny or too thick?
If it’s too runny, add more sifted confectioners’ sugar in small increments until you reach the right consistency. If too stiff, add a little heavy cream or milk—again, in small amounts—to loosen it up without going too far.
Q: Can I decorate differently if I don’t have candy eyes or chocolate wafers?
Absolutely! Use mini chocolate chips, small candies, marshmallows cut in half, or even icing pens to draw eyes. If you don’t have wafers, melt chocolate chips; for shapes you could use fondant or even pretzels for legs.
Q: Are these cupcakes freezer‐friendly?
Unfrosted cupcakes freeze very well. Once cooled, wrap in plastic wrap, then freeze. Thaw completely before frosting. Frosted ones are finicky—any creamy frosting and soft decorations may be affected by freezer‐temperature changes, so freeze carefully or decorate after thawing.
Q: How can I make the spiders look more realistic?
Use darker chocolate for contrast, longer thin legs, maybe add a small brush of edible shimmer or gel to give them dimension. Piping slightly raised segments for the spider bodies helps too. Use fine piping tips (or small bag snips) for delicate leg lines.
Conclusion
Thank you so much for baking along with me! I hope you enjoy making (and eating) these Easy Spider Cupcakes as much as I do. There’s something so satisfying about turning simple ingredients into something playful, moist, and full of chocolate‑loving flavor—perfect for delighting friends, family, or just treating yourself. Whether you keep the decorations basic or go all out with spooky flair, I believe these cupcakes bring joy with their ease and taste. Happy baking—and here’s to sweet moments, joyful crumbs, and lots of laughter around the kitchen!
Print
Easy Spider Cupcakes
- Prep Time: 15 minutes
- Cook Time: 20 minutes
- Total Time: 35 minutes
- Yield: 24 cupcakes 1x
- Category: Dessert
Description
Easy Spider Cupcakes are fun Halloween treats made with moist chocolate cupcakes, creamy buttercream, and spooky spider toppers.
Ingredients
Here’s everything you’ll need to make these cupcakes and the spooky spider toppers:
For the cupcakes:
1 (15.25 oz.) box Devil’s Food cake mix
1 (3.9 oz.) box instant chocolate pudding mix
1 cup sour cream
½ cup water
½ cup vegetable oil
4 large eggs
For the frosting and decorations:
1 cup unsalted butter, softened
2 teaspoons vanilla extract
2 Tablespoons heavy cream
3 cups confectioners’ sugar, sifted
2 cups chocolate melting wafers or chocolate chips
Chocolate sprinkles
Candy eyes
Instructions
. Preheat & Prep
Preheat your oven to 350°F (175°C). Line two standard muffin pans with cupcake liners (about 24‰26 liners depending on size).
2. Mix the Cupcake Batter
In a large bowl, or your stand mixer fitted with the paddle attachment, combine:
Devil’s Food cake mix
Instant chocolate pudding mix
Sour cream
Water
Vegetable oil
Eggs
Beat on medium speed until the batter is smooth and all ingredients are fully incorporated, scraping down the sides of the bowl as needed.
3. Bake the Cupcakes
Divide the batter evenly between the cupcake liners. Bake for 18–22 minutes, or until a toothpick inserted into the center of a cupcake comes out clean (little moist crumbs are okay, but no raw batter). Once done, let the cupcakes rest in the pan for about 5 minutes, then transfer to a wire rack to cool completely.
4. Make the Buttercream Frosting
In a clean mixing bowl, cream the softened butter until it’s smooth and fluffy. Add vanilla extract. Gradually add half of the sifted confectioners’ sugar and beat until combined, scraping the bowl as needed.
Next, add the heavy cream and the remaining confectioners’ sugar, and beat again until the frosting is thick, creamy, and spreadable. If the frosting seems too thick, add a little more cream (½ teaspoon at a time); if too thin, add more sifted sugar.
5. Create the Chocolate Spiders
Line a baking sheet with wax paper.
Melt the chocolate melting wafers (or chips) according to package instructions.
Transfer melted chocolate to a piping bag or a sealable plastic bag, snipping off a small corner.
Pipe out spider bodies and heads, then pipe on legs to create spider shapes. Add chocolate sprinkles while the chocolate is still warm to give texture (e.g. fuzzy or hairy look).
Place candy eyes on the spider faces.
Let the spiders set and fully harden at room temperature (or speed up in the fridge if needed).
6. Assemble Cupcakes
Once cupcakes are completely cool, frost them with the buttercream using an offset spatula or piping bag (if you prefer decorative piping). Carefully peel the hardened chocolate spiders off the wax paper and place one atop each frosted cupcake.
Notes
For thicker frosting, refrigerate before piping.
Double the frosting for taller swirls.
Use colored candy melts for themed variations.
Nutrition
- Serving Size: 1 cupcake
- Calories: 294
- Sugar: 31g
- Carbohydrates: 38g
- Protein: 2g


