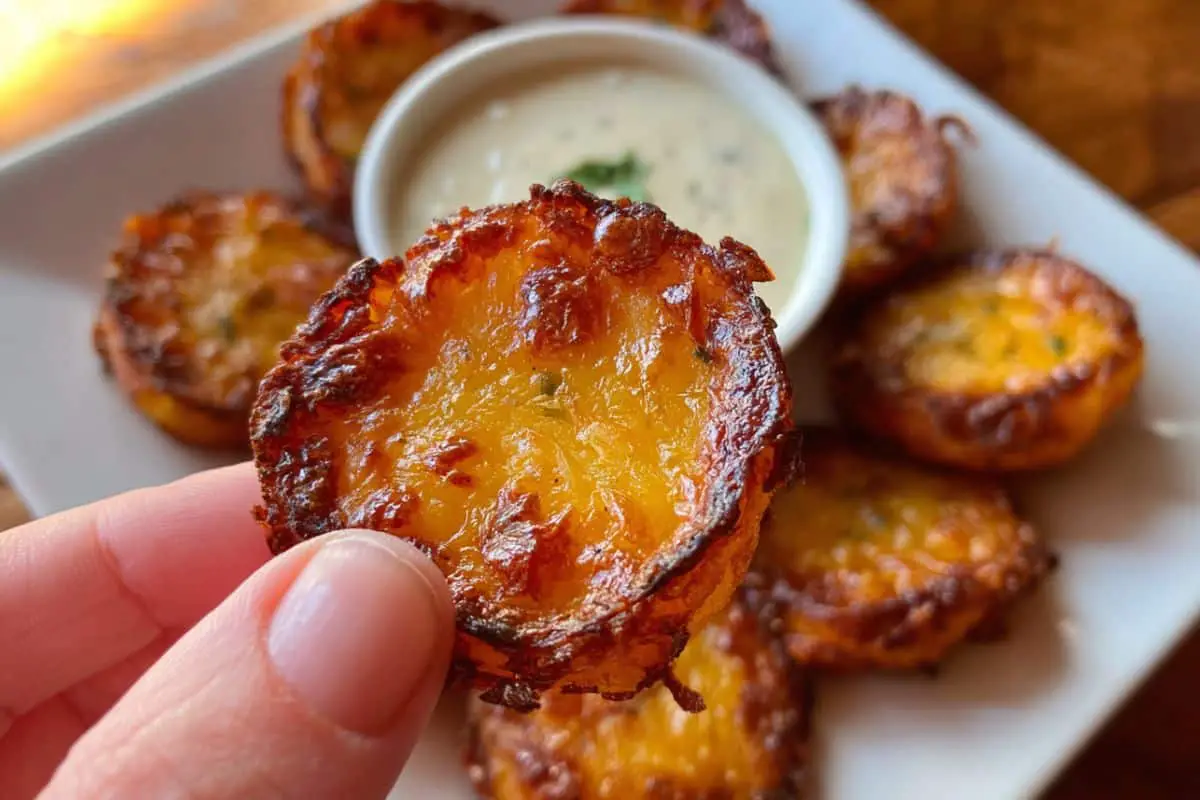
Crispy Cheesy Dill Pickle Chips are the kind of snack that catches your attention and won’t let go. This fun twist – combining the tangy pop of dill pickle chips with melted, golden‑browned cheese – delivers crunchy, savory, slightly‑briny bites that make the perfect appetizer or party snack. Let’s dive in and explore why you’ll love this recipe and how to make it effortlessly in your oven (with an optional air‑fryer finish!).
Why You’ll Love This Recipe
You’ll love these Crispy Cheesy Dill Pickle Chips because they take two beloved snack flavors and marry them: the bold, vinegary crunch of dill pickles and the gooey, melty richness of shredded cheese. They’re easy to assemble in a muffin tin (no complicated coating, frying, or breading required), bake up in about 15 minutes, and then transform into a crisp show‑stopper. They’re ideal for game day, a snack table, or even a unique side dish. The optional air‑fryer step gives them a satisfying extra crunch if you’re feeling fancy. Best of all: quick, flavorful, fun to share — and delightful to dig into.
Ingredients
-
2 cups shredded cheese (I used Colby Jack)
-
24–36 dill pickle chips (as many as needed to top each cheesy cup)
-
1 tablespoon blackening seasoning (or your favourite seasoning blend)
-
Non‑stick cooking spray (optional, for the muffin tin)
-
Optional: dipping sauce (e.g., ranch or a tangy Alabama white sauce)
Step‑by‑Step: How to Make Crispy Cheesy Dill Pickle Chips
-
Preheat your oven to 400 °F (≈ 200 °C).
-
Pat the dill pickle chips dry on paper towels to remove excess moisture.
-
If using a non‑stick 12‑cup muffin tin, you may lightly spray each cup with non‑stick cooking spray.
-
Place a generous pinch of shredded cheese into each muffin cup.
-
Top each cheese bed with two or three dill pickle chips.
-
Sprinkle about ⅓ of the blackening seasoning evenly over the pickle chips (or divide the seasoning among all cups).
-
Top each cup with more shredded cheese to fully cover the pickles.
-
Bake for about 15 minutes, or until the cheese has melted and browned around the edges.
-
Optional: For extra crisp, after baking remove each cheesy pickle chip from the muffin tin and place into an air‑fryer at 400 °F for ~5 minutes.
-
Serve immediately with your favourite dipping sauce (ranch or a tangy white sauce both pair beautifully).
Helpful Tips

-
Drying the pickles matters: Too much moisture and your cheese can steam instead of crisp. Patting the chips dry helps them stay crisp.
-
Cheese choice: Colby Jack is creamy and melts well; you could also try sharp Cheddar, Pepper Jack (for a bit of heat), or a blend.
-
Seasoning variation: The blackening seasoning adds smoky‑spicy depth; if you don’t have it try Cajun seasoning, garlic‑herb blend, or even a little smoked paprika + salt.
-
Don’t overfill: Fill each muffin cup so that the cheese doesn’t spill over when melted—less mess, cleaner crisp.
-
Watch the browning: Once the cheese starts to brown around the edges, it’s done. Remove promptly; over‑baking may make the texture too rigid.
-
Serve right away: These are best hot and freshly crisped; they soften if left too long.
-
Make‑ahead caution: You can prepare the cups in advance (up to the point of baking) but bake and air‑fry just before serving for best texture.
Substitutions And Variations
-
Swap the Colby Jack for any good melting cheese: sharp Cheddar, Monterey Jack, Pepper Jack (for heat), Mozzarella plus a sharper cheese for contrast.
-
Use different pickle varieties: half‑sours, spicy dill, or even bread‑and‑butter chips for a sweeter twist.
-
Seasoning tweaks: Instead of blackening seasoning use taco seasoning, Old Bay, everything‑bagel seasoning, or a sprinkle of red‑pepper flakes for heat.
-
Gluten‑free/keto‑friendly: This recipe is naturally low‑carb if you use plain pickles and cheese (no flour, breading or batter).
-
Serving style tweak: Instead of muffin cups you could spread in a parchment‑lined sheet pan, top with pickles and cheese, bake, then cut into squares after baking.
Storage Instructions
-
Leftovers: These are best eaten immediately, but if you have leftovers store them in an airtight container in the refrigerator for up to 1 day.
-
Re‑crisping: To refresh, place them in the oven or air‑fryer at ~350 °F for a few minutes until warmed and crisp again. Avoid the microwave, which will make them soggy.
-
Pre‑make step: You can assemble the cheese + pickle cups ahead of time (cover tightly) and refrigerate briefly, then bake when ready to serve.
Nutritional Information
Estimates vary depending on specific cheese and pickle products used. One version of a similar recipe lists a per‑chip serving as: ~80 calories, ~6 g fat, ~3.5 g saturated fat, ~1 g carbs, ~5 g protein.
Another version lists ~97 calories per serving (8 g fat, 1 g carb, 5 g protein) for a recipe using 24 pickle slices and ~2½ cups cheese.
Because this snack is cheese‑based and includes seasoned pickles (which are high in sodium), keep in mind: higher sodium, saturated fat, and calories compared to plain vegetables. If sodium intake is a concern, pick lower‑sodium pickles and adjust seasoning accordingly.
Serving Suggestions
-
Arrange on a snack or appetizer tray alongside small bowls of dipping sauce (ranch, blue‑cheese, tangy Alabama white sauce or even spicy mustard).
-
Serve as a fun pre‑meal nibble at gatherings: these are easy to eat with fingers, no utensils.
-
Pair with crisp vegetable sticks or celery to balance richness and add crunch contrast.
-
Make them part of a snack board: cheese, pickles, olives, charcuterie, nuts — add these crispy bites for a fun accent.
-
Game‑day, movie‑night or party: serve warm so the cheese is still melty and vibrant.
Frequently Asked Questions About Crispy Cheesy Dill Pickle Chips
Q: Can I make these ahead of time?
A: You can prep the cheese and pickle cups in advance and keep them chilled, but for best results bake and optionally air‑fry right before serving so they stay crisp and fresh. If you bake too early, the cheese may soften and lose crispness.
Q: Can I use whole pickles instead of chips?
A: Yes — you’d slice whole dill pickles into chips or rounds, pat well dry, and proceed. Just make sure they’re not too thick so the cheese can fully cover and crisp around them.
Q: Can I make these in the air‑fryer only (skip oven)?
A: Possibly yes — after assembling the cheese + pickle cups, you can try air‑frying at 400 °F for ~4‑6 minutes until the cheese is melted and edges browned. Watch closely to avoid burning.
Q: Are these gluten‑free / keto friendly?
A: They can be both if you use cheese and pickles without any added flour or breading. Check your pickle’s ingredients list for potential additives. Because they’re high in fat and low in carbs (mostly from cheese and pickles), they can fit a low‑carb/keto snack if calories and sodium are accounted for.
Q: How do I prevent the cheese from sticking to the muffin tin?
A: Using a non‑stick silicone muffin tin or spraying a light non‑stick coating helps. Also allow the cups to cool slightly before attempting to remove them; the cheese will firm up a bit and release easier.
Conclusion
Thank you so much for trying this recipe for Crispy Cheesy Dill Pickle Chips. From the moment you smell that baked, bubbling cheese and that tangy pickle aroma, you’ll know you’re in for something special. I’ve loved making these for friends and family—they always disappear fast! They’re wonderfully easy to pull together, flavorful, and bring a little fun twist to snack time. I hope they bring as much joy to your kitchen as they have to mine. Happy cooking—may your crispy, melty cheese‑pickle creations be a hit, and thank you for being part of this food‑loving community. Enjoy every bite!

Crispy Cheesy Dill Pickle Chips
- Prep Time: 10 minutes
- Cook Time: 15 minutes
- Total Time: 25 minutes
- Yield: 12 chips 1x
- Category: Snack, Appetizer
Description
Crispy Cheesy Dill Pickle Chips are a quick and crunchy low-carb snack made with melty cheese, dill pickles, and bold seasoning. Perfect for parties, game day, or satisfying snack cravings in minutes.
Ingredients
2 cups shredded cheese (e.g., Colby Jack)
24–36 dill pickle chips
1 tbsp blackening seasoning
Non-stick cooking spray (optional)
Dipping sauce (optional, e.g., ranch or Alabama white sauce)
Instructions
-
Preheat your oven to 400 °F (≈ 200 °C).
-
Pat the dill pickle chips dry on paper towels to remove excess moisture.
-
If using a non‑stick 12‑cup muffin tin, you may lightly spray each cup with non‑stick cooking spray.
-
Place a generous pinch of shredded cheese into each muffin cup.
-
Top each cheese bed with two or three dill pickle chips.
-
Sprinkle about ⅓ of the blackening seasoning evenly over the pickle chips (or divide the seasoning among all cups).
-
Top each cup with more shredded cheese to fully cover the pickles.
-
Bake for about 15 minutes, or until the cheese has melted and browned around the edges.
-
Optional: For extra crisp, after baking remove each cheesy pickle chip from the muffin tin and place into an air‑fryer at 400 °F for ~5 minutes.
-
Serve immediately with your favourite dipping sauce (ranch or a tangy white sauce both pair beautifully).
Notes
Use parchment or silicone muffin liners for easy release.
Drying pickles well ensures extra crispy texture.
Try Pepper Jack or sharp Cheddar for added kick.
Nutrition
- Serving Size: 1 chip
- Calories: 97
- Sugar: 0g
- Carbohydrates: 1g
- Protein: 5g