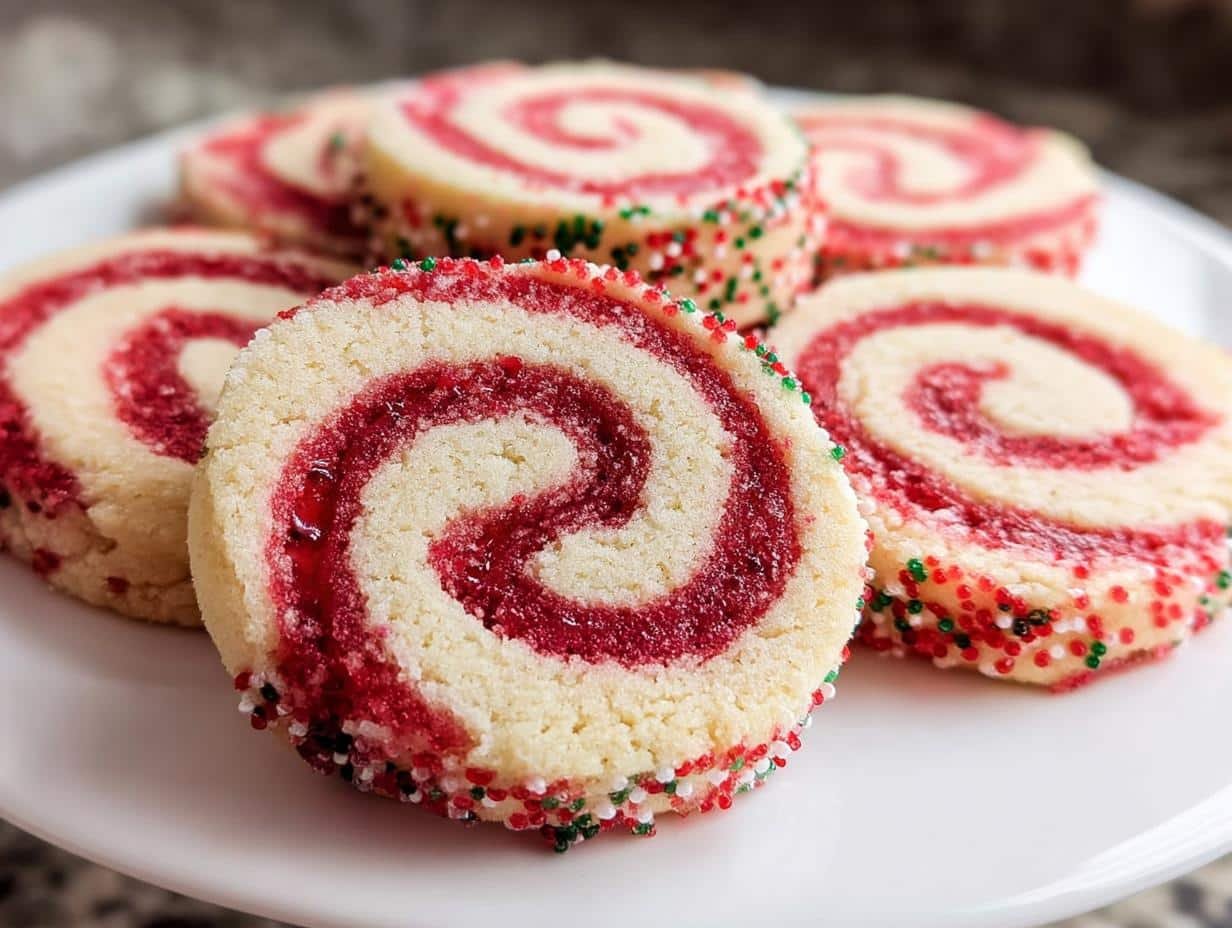
Nothing screams holiday cheer quite like these gorgeous Christmas pinwheel cookies twirling with festive red and vanilla swirls. Every time I pull a tray of these from the oven, my family comes running—they’re that irresistible! I’ve been making these buttery, swirl-tastic treats for years, and they never fail to steal the show at cookie swaps or cozy Christmas Eve gatherings. The best part? That stunning pinwheel design looks fancy but is totally doable—just wait till you see how easy the magic happens!

Ingredients for Christmas Pinwheel Cookies
Let’s gather those simple ingredients that transform into holiday magic! Trust me, you probably have most of these in your pantry already. The beauty of these cookies lies in their simplicity—just a handful of basics come together to create something spectacular.
Here’s what you’ll need:
- 1¼ cups granulated sugar – The perfect amount for sweetness without overpowering
- 1 cup salted butter, softened – I always set mine out 30 minutes before baking (soft but still cool to the touch)
- 1½ teaspoons vanilla extract – Pure vanilla makes all the difference
- 1 large egg – Room temperature blends best
- 3 cups all-purpose flour – Spooned and leveled for perfect measurement
- ½ teaspoon baking powder – Just enough lift without puffing up those pretty swirls
- ½ teaspoon red liquid food coloring – The vibrant pop that makes these holiday-ready (I like McCormick’s classic red)
See? Nothing fancy—just good old-fashioned baking staples ready to become something extraordinary. Now let’s make some cookie magic!
How to Make Christmas Pinwheel Cookies
Okay, let’s dive into the fun part—turning those simple ingredients into showstopping swirls! Don’t let the fancy look intimidate you. I’ll walk you through each step, just like I’m right there in the kitchen with you. The secret? Patience with the chilling steps—it makes all the difference for those perfect pinwheels.
Mixing the Dough
First, grab your stand mixer (or a big bowl and sturdy wooden spoon if you’re going old-school). Toss in the sugar, that glorious softened butter, and vanilla. Beat it on medium until it’s creamy and dreamy—about 2 minutes should do it. Scrape down the sides with a spatula (trust me, those sneaky unmixed bits matter!). Crack in your egg and mix just until it disappears into the batter.
Now, sprinkle in the flour and baking powder. Mix on low—you want to stop the second those flour streaks vanish. Overmixing makes tough cookies, and we want these babies tender! The dough should pull away from the bowl’s sides when it’s ready.
Coloring and Chilling
Here’s where the holiday magic starts! Scoop out half the dough onto parchment paper—this stays vanilla. Now add that vibrant red food coloring to the remaining dough in the bowl. Mix on low until it’s uniformly festive (no pale pink spots allowed!).
Divide both colors in half again—you’ll have four equal portions total. Shape each into rough rectangles (don’t stress perfection yet!), wrap in plastic, and chill for 30 minutes. This firm-up step is crucial—soft dough equals squished swirls later!
Rolling and Assembling
After chilling, roll one portion between parchment into an 11×7-inch rectangle. Repeat with all pieces—the parchment prevents sticking without extra flour. Use a straightedge to trim uneven edges (save those scraps for marbled cookies!).
Now the fun part: layer one red sheet atop vanilla, then stack another set with red on bottom. Gently roll each stack into a tight log—like a jellyroll but with cookies! Wrap these beauties tightly and chill again for 1-2 hours (or overnight). This sets those swirls so they won’t blur when sliced.

Slicing and Baking
Preheat your oven to 350°F and line baking sheets with parchment. Unwrap one log—if you’re feeling fancy, roll it in red/green sprinkles now! Using a sharp knife, slice ¼-inch cookies (thicker if you prefer softer centers). Space them 1 inch apart—they don’t spread much but need breathing room.
Bake for 9-11 minutes until just barely golden at the edges. These cookies are sneaky—they’ll look underdone but firm up perfectly as they cool. Let them rest on the sheet for 2 minutes before transferring to racks. Repeat with remaining dough, and try not to eat them all warm—they’re irresistible!
Why You’ll Love These Christmas Pinwheel Cookies
Oh my goodness, where do I even begin? These cookies have been my holiday secret weapon for years, and once you try them, you’ll understand why everyone goes crazy for them!
- Festive showstoppers: Those gorgeous red-and-white swirls look like they came from a fancy bakery, but nope—just your cozy kitchen!
- Buttery perfection: The texture is absolute magic—crisp edges with a tender, melt-in-your-mouth center that makes you close your eyes and sigh.
- Make-ahead dream: The dough logs keep beautifully in the fridge for days (or freezer for months!), so you can slice-and-bake fresh cookies whenever holiday guests pop by.
- Kid-approved fun: Little hands love helping roll the dough and watching the swirls appear—it’s like edible holiday magic!
Seriously, one bite and these will become your new Christmas tradition—they’re that special!
Tips for Perfect Christmas Pinwheel Cookies
After making these cookies more times than I can count (and eating plenty of “test batches”), I’ve picked up some foolproof tricks to guarantee pinwheel perfection every single time. These little nuggets of wisdom will save you from any holiday baking mishaps!
Chill like it’s winter: That dough needs serious fridge time—I often chill mine overnight. Cold dough holds those gorgeous swirls when slicing. If it feels too firm coming out, let it sit for 5 minutes before cutting.
Sharp knives win: A dull blade will squish your beautiful spirals. I keep my thinnest, sharpest knife just for cookie slicing—it glides through like butter (pun intended!).
Rotate those pans: Ovens have hot spots! Halfway through baking, spin your sheets 180 degrees for even browning. Those edges should stay pale while the centers set.
Parchment is your friend: Skip the greased pans—parchment prevents sticking without altering texture. Bonus? No messy cleanup between batches!
Slice slow and steady: Saw gently back-and-forth instead of pressing down. Rushing equals squished cookies—and nobody wants lopsided pinwheels!
Ingredient Substitutions
Ran out of something? No panic—I’ve tested plenty of swaps over the years! For salted butter, use unsalted plus ¼ teaspoon salt. Gel food coloring works instead of liquid (start with a toothpick dip—it’s potent!). Need gluten-free? A 1:1 GF flour blend works, though the texture might be slightly more delicate.
Here’s my golden rule: the closer you stick to the original, the more those perfect pinwheels will shine. But hey, holiday baking should be joyful, not stressful—adapt as needed and embrace the delicious results!
Storing and Freezing
Here’s the beautiful thing about these Christmas pinwheel cookies—they keep like a dream! Once completely cooled, stack them in an airtight container with parchment between layers. They’ll stay fresh and buttery for up to a week at room temperature (if they last that long!).
For longer storage, those dough logs freeze beautifully. Wrap them tightly in plastic wrap, then slip into freezer bags—they’ll keep for 3 months. When holiday cravings hit, just slice frozen (no thawing needed!) and bake as usual, adding a minute or two to the baking time. You can even freeze pre-sliced cookies on a tray before transferring to bags—instant homemade cookies whenever you need a festive pick-me-up!
Christmas Pinwheel Cookies FAQs
Over the years, I’ve gotten so many questions about these festive cookies—let me share the answers that’ll help you nail them on your first try! These are the troubleshooting tips I wish I’d known when I first started making pinwheels.
Can I use natural food coloring instead of red dye?
Absolutely! I’ve had great success with beet powder or raspberry juice concentrate for a softer red hue. Just know natural dyes may fade slightly during baking—your swirls will be more pastel than vibrant. For the boldest color, reduce liquid ingredients slightly when using fruit-based dyes to prevent sticky dough.
Help! My dough is too sticky to roll—what now?
Been there! Pop it back in the fridge for another 30 minutes—cold dough is way easier to handle. If it’s still tacky, lightly dust your parchment with powdered sugar (not flour, which dries out cookies). And don’t worry if your first attempts look messy—even my early batches weren’t Instagram-perfect!
What’s the trick to slicing without squishing the swirls?
Three magic words: sharp, cold, and slow. Use a chef’s knife you’d use for tomatoes (dull blades mash), keep dough chilled until the last second, and use a gentle sawing motion. Pro tip? Dip your knife in hot water and dry it between slices for ultra-clean cuts!
Can I make these ahead and freeze baked cookies?
You bet! These freeze beautifully for up to 2 months. Just cool completely, then layer in airtight containers with parchment between. Thaw at room temperature—they’ll taste freshly baked. Though honestly? The dough logs freeze better—slice-and-bake straight from frozen whenever you need a holiday cookie fix!
Why did my swirls blur together during baking?
Usually means the dough wasn’t chilled enough before slicing. Next time, chill logs overnight—the colder the dough, the sharper those red-and-white spirals stay! Also avoid overhandling when rolling; warm hands can soften the layers prematurely.
Nutrition Information
Just so you know, these nutrition facts are estimates—actual values can vary based on ingredient brands and cookie size. But here’s the scoop per cookie (because let’s be real, who stops at just one?):
- Calories: 112kcal
- Sugar: 7g
- Fat: 6g (3.5g saturated)
- Carbs: 13g
- Protein: 1g
Now go enjoy that buttery swirl without guilt—it’s Christmas!
Did you make these Christmas pinwheel cookies? I’d love to see your swirl-tastic creations! Snap a photo and tag me on Pinterest—nothing makes me happier than seeing your holiday baking wins. And if you adored them as much as my family does, leave a star rating so others can find this festive gem too!
Print
Magical Christmas Pinwheel Cookies in 5 Easy Steps
- Prep Time: 20 minutes
- Cook Time: 10 minutes
- Total Time: 3 hours
- Yield: 36 cookies 1x
- Category: Dessert
- Method: Baking
- Cuisine: American
- Diet: Vegetarian
Description
These fun, festive Christmas pinwheel cookies are perfect for the holidays with layers of swirled sugar cookie dough for the ultimate sweet treat!
Ingredients
- 1¼ cups granulated sugar
- 1 cup salted butter, softened
- 1½ teaspoons vanilla extract
- 1 large egg
- 3 cups all-purpose flour
- ½ teaspoon baking powder
- ½ teaspoon red liquid food coloring
Instructions
- In the bowl of a stand mixer with the paddle attachment, add the sugar, butter, and vanilla extract. Beat the ingredients on medium until creamy, about 2 minutes.
- Use a rubber spatula and scrape down the sides of the bowl. Add the egg and continue mixing until combined.
- Add the flour and baking powder and mix together on the low setting until no streaks of flour are visible.
- Scrape down the sides of the bowl. Divide the dough in half and remove half of it to a piece of parchment paper. Add the food coloring to the remaining dough in the stand mixer bowl and mix together on low speed until the color is uniform.
- Divide each half of the dough in half so that you have 2 red and 2 dough-colored pieces. Form each piece into its own separate rectangle. Wrap in plastic wrap and place in the refrigerator for 30 minutes.
- After the dough is finished chilling, remove one piece of dough and roll it out on a piece of parchment paper until it is roughly an 11×7-inch rectangle. Repeat with all pieces of dough. Trim the edges with a knife, so you have straight lines.
- Once all 4 pieces of dough are rolled out, carefully place one red piece on top of the dough-colored piece. On the other two pieces, place the red on the bottom.
- Carefully roll each rectangle into a log. Wrap in plastic wrap and place back in the refrigerator for an additional 1 to 2 hours, or overnight.
- When ready to bake these cookies, preheat the oven to 350°F. Line a baking sheet with parchment paper and set aside.
- Optional: Roll the log in Christmas nonpareils to coat the outside.
- Carefully slice ¼ to ½-inch-thick cookies, depending on how thick you want them.
- Space cookies about 1 inch apart on the baking sheet. Place in the oven and bake for 9 to 11 minutes, or until the cookies are barely starting to brown on the edges. These cookies taste best if they are not overcooked, so watch them carefully.
- Let cookies cool on the baking sheet for 2 to 3 minutes, and then transfer to a wire rack to cool completely.
- Repeat the steps to finish cooking the remaining log of cookies.
Notes
- Chill dough thoroughly for easier handling.
- Watch cookies closely to avoid overcooking.
Nutrition
- Serving Size: 1 cookie
- Calories: 112kcal
- Sugar: 7g
- Sodium: 50mg
- Fat: 6g
- Saturated Fat: 3.5g
- Unsaturated Fat: 2g
- Trans Fat: 0g
- Carbohydrates: 13g
- Fiber: 0g
- Protein: 1g
- Cholesterol: 20mg


