Nothing screams holiday cheer quite like pulling out a tray of these chocolate peanut butter Christmas trees at your next gathering. I still remember the first time I made them – my niece’s eyes lit up brighter than the tree lights when she saw those little chocolate-dipped treasures! These no-bake wonders combine two of life’s greatest flavors (I mean, who can resist peanut butter and chocolate?) in the most festive way possible. They’re ridiculously easy to whip up, yet look like you spent hours in the kitchen. Trust me, once you try these rich, creamy bites, they’ll become your new holiday tradition just like they did for my family.

Why You’ll Love These Chocolate Peanut Butter Christmas Trees
Let me tell you why these little trees steal the show every holiday season:
- No oven required – perfect for when your kitchen’s already overflowing with cookies and pies
- Impressively festive with minimal effort (that drizzle makes them look bakery-worthy!)
- Rich peanut butter center that melts in your mouth against the crisp chocolate shell
- Kid-friendly project – my nieces love helping cut out the tree shapes
- Make-ahead magic – they actually taste better after chilling overnight
Honestly? The hardest part is not eating all the peanut butter mixture before it makes it into the trees!
Ingredients for Chocolate Peanut Butter Christmas Trees
Here’s everything you’ll need to make these holiday treats – I’ve learned through trial and error that quality ingredients really make a difference here:
- ½ cup salted butter, melted and cooled (trust me, salted balances the sweetness perfectly)
- 2 cups creamy peanut butter – skip the natural kind here, we need that smooth texture
- ¼ cup granulated sugar – just enough to enhance the peanut butter flavor
- 1 tablespoon vanilla extract – the good stuff, not imitation!
- 4 cups powdered sugar – sifted if you want extra smooth filling
- 3 cups semi-sweet chocolate chips (or mix half semi-sweet with half milk chocolate for a sweeter coating)
- 2 tablespoons shortening – this makes the chocolate coating perfectly smooth
For the optional but oh-so-pretty drizzle:
- ½ cup milk chocolate chips and ½ cup white chocolate chips
- 1 teaspoon shortening, divided – just a tiny bit keeps the drizzle flowing smoothly
See? Nothing too fancy – just pantry staples transformed into something magical!

Equipment You’ll Need
Gathering your tools before starting makes this process so much smoother – here’s what you’ll want to have ready:
- Christmas tree cookie cutter (about 2-3 inches tall works best)
- Parchment paper – lifesaver for easy cleanup and preventing sticking
- Half sheet pan or jelly roll pan for chilling
- Microwave-safe bowl for melting chocolate (or use a double boiler if you’re fancy)
- Hand mixer – though a sturdy spoon and arm power works in a pinch!
- Fork for dipping those little trees
- Plastic baggies or piping bags for the drizzle
That’s it! No special equipment needed – just basic kitchen tools you probably already have.
How to Make Chocolate Peanut Butter Christmas Trees
Okay, let’s get to the fun part! I promise this is easier than wrapping presents (and way more delicious). Follow these steps and you’ll have a forest of chocolatey holiday treats in no time.
Preparing the Peanut Butter Base
First, line that half sheet pan with parchment paper – this saves so much headache later! Now grab your hand mixer and beat together the melted butter, peanut butter, granulated sugar, and vanilla until it’s smooth as Santa’s sleigh ride. The mixture should look creamy and dreamy.
Here’s my secret: add the powdered sugar gradually while mixing. If you dump it all in at once, you’ll end up with a powdered sugar cloud (been there, cleaned that). The mixture will get thick – like playdough thick – and that’s perfect. Press it evenly into your prepared pan, aiming for about ½-inch thickness. I use my hands (lightly greased) to really smooth it out.
Cutting and Chilling the Trees
Pop that pan in the freezer for 15 minutes – set a timer! You want it firm enough to cut but not rock hard. Lift the parchment to transfer your peanut butter slab to the counter. Pro tip: put down fresh parchment first so your trees don’t stick.
Now the fun part! Press your tree cookie cutter straight down – no twisting! Twisting makes ragged edges (learned that the hard way). If the mixture gets too soft, just pop it back in the freezer for 5 minutes. Gather the scraps, press them together, and cut more trees until you’ve used all that peanut butter goodness.
Freeze those cutouts for 30 minutes – this step is crucial for perfect chocolate coating later. Trust me, I’ve tried skipping it and ended up with peanut butter blobs instead of trees!
Coating with Chocolate
While the trees chill, melt your chocolate chips with shortening in 30-second microwave bursts, stirring between each. When it’s smooth and glossy, you’re ready to dip!
Here’s my dipping technique: spear a frozen tree with a fork, dunk it completely, then gently tap the fork against the bowl’s edge to remove excess chocolate. Place it back on the parchment – the chocolate should set quickly since the trees are cold. Work in small batches so the peanut butter stays firm.
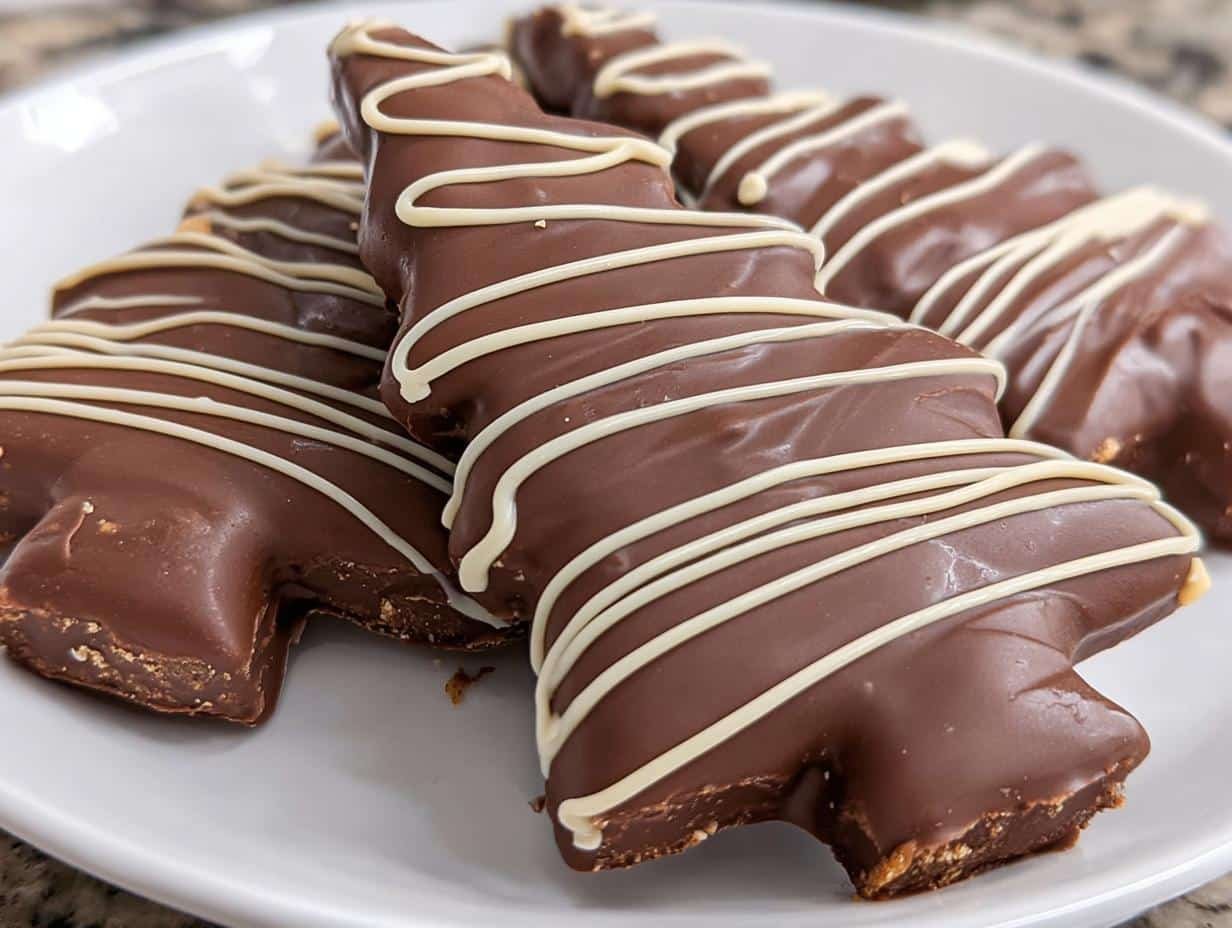
Adding Decorative Drizzle
For that extra festive touch, melt your drizzle chocolates separately (with just a tiny bit of shortening). Transfer each to a plastic baggie, snip a teeny corner, and zigzag away! Let your inner artist shine – imperfect drizzles look charmingly homemade. Let everything set for about 5 minutes before serving or storing.
See? Not hard at all! The chilling steps take the most time, but that’s when you can sip cocoa and admire your handiwork.
Tips for Perfect Chocolate Peanut Butter Christmas Trees
After making dozens of batches (okay, maybe hundreds – what can I say, my family’s obsessed!), here are my tried-and-true tips:
- Too sticky? Chill longer! The peanut butter mixture firms up beautifully with extra freezer time.
- Chocolate too thick? Add a smidge more shortening – just ½ teaspoon at a time until it flows smoothly.
- Trees losing shape? Work fast in small batches to keep everything cold while dipping.
- Drizzle troubles? Warm the baggie in your hands for a few seconds if the chocolate stiffens.
Remember – even “messy” trees taste incredible, so don’t stress perfection!
Variations for Chocolate Peanut Butter Christmas Trees
Want to mix things up? Here are some of my favorite twists on this recipe:
- Dark chocolate lovers: Swap semi-sweet for dark chocolate chips – the bittersweet contrast is heavenly
- Nut-free option: Use sunflower seed butter instead of peanut butter (just add a pinch more sugar)
- Crunchy surprise: Mix chopped peanuts or crushed candy canes into the peanut butter base
- Almond joy: Try almond butter and top with toasted coconut flakes before the chocolate sets
The possibilities are endless – make them your own!
Storing and Serving Chocolate Peanut Butter Christmas Trees
These little trees keep beautifully in an airtight container in the fridge for up to a week – if they last that long! I like to serve them chilled straight from the fridge – the peanut butter stays firm and the chocolate has that perfect snap. For parties, arrange them on a platter about 15 minutes before serving so they soften just slightly. Pro tip: layer them between parchment paper so the drizzle doesn’t smudge!
Nutritional Information for Chocolate Peanut Butter Christmas Trees
Now, let’s be real – these are holiday treats, not health food! But since you’re curious (I always am too), here’s the scoop per tree:
- 428 calories – consider it festive fuel!
- 25g fat (10g saturated) – mostly from all that delicious peanut butter and chocolate
- 35g sugar – hey, it’s Christmas!
- 8g protein – peanut butter’s saving grace
Remember, these values are estimates – your exact numbers will vary based on brands and how generous you are with that chocolate coating!
Frequently Asked Questions
Can I freeze these chocolate peanut butter Christmas trees?
Absolutely! These freeze like a dream. Just place them in a single layer in an airtight container with parchment between layers. They’ll keep for up to 2 months. Thaw in the fridge overnight – the chocolate stays perfect and the peanut butter stays creamy.
How long do they keep at room temperature?
I don’t recommend leaving them out more than 2 hours – the peanut butter gets too soft. For parties, keep them chilled until 15-30 minutes before serving. That sweet spot gives you perfect texture!
Can I use crunchy peanut butter instead?
You can, but the trees won’t cut as cleanly. If you love that crunch, try mixing in chopped peanuts instead – about ¼ cup does the trick without messing with the texture.
Why does my chocolate coating crack?
This happens if the peanut butter centers are too cold when dipping! Let them sit at room temp for 3-5 minutes before coating. The slight warming prevents temperature shock that causes cracks.
Can I make these without a tree cookie cutter?
Of course! Use any shape you like – stars work great for holidays too. No cutter? Roll the mixture into balls and dip for simple peanut butter bonbons.
Share Your Holiday Creations
I’d love to see your chocolate peanut butter Christmas tree masterpieces! Snap a photo and tag me – nothing makes me happier than seeing your holiday kitchen adventures. Happy baking!
Print
Chocolate Peanut Butter Christmas Trees in 30 Minutes
- Prep Time: 45 minutes
- Cook Time: 0 minutes
- Total Time: 1 hour 45 minutes
- Yield: 24 servings 1x
- Category: Dessert
- Method: No-Bake
- Cuisine: American
- Diet: Vegetarian
Description
Bring a little bit of extra holiday cheer with these rich and decadent chocolate peanut butter Christmas trees.
Ingredients
- ½ cup salted butter, melted and cooled
- 2 cups creamy peanut butter
- ¼ cup granulated sugar
- 1 tablespoon vanilla extract
- 4 cups powdered sugar
- 3 cups semi-sweet chocolate chips (or a combination of semi and milk chocolate chips)
- 2 tablespoons shortening
- Drizzle: ½ cup milk chocolate chips or pieces
- Drizzle: ½ cup white chocolate chips or pieces
- Drizzle: 1 teaspoon shortening, divided in half
Instructions
- Line a jelly roll or half sheet pan with parchment paper and set it aside.
- Using a hand mixer, beat together melted butter, peanut butter, granulated sugar, and vanilla extract until smooth and creamy. Beat in powdered sugar.
- Press peanut butter mixture into a sheet pan, spreading to about ½-inch thickness.
- Place sheet pan in the freezer for 15 minutes.
- Lift the parchment paper to remove the chilled peanut butter layer from the pan. Place a new sheet of parchment paper on the pan.
- Use a cookie cutter to cut out ½” thick Christmas tree shapes from the chilled peanut butter layer.
- Place cutouts on a parchment-lined sheet pan. Freeze for 30 minutes.
- Scoop up the remnant peanut butter mixture, repress to ½-inch thickness, and cut out additional shapes.
- After cutouts have chilled for 25 minutes, prepare the chocolate coating.
- Combine milk chocolate chips and 2 tablespoons of shortening in a heatproof bowl. Heat and stir in 30-second increments in the microwave until the chocolate is smooth and melted completely.
- Using a fork, lift one peanut butter cutout at a time and coat it completely with the melted chocolate. Tap excess chocolate off the cutout and place it back onto the cookie sheet.
- Work in batches if the peanut butter cutout becomes soft quickly.
- Allow chocolate to harden.
- For optional drizzle, microwave chocolate chips or chopped pieces and shortening (½ teaspoon per ½ cup) in 30-second increments until melted and smooth.
- Scoop melted chocolate into a plastic baggy or piping bag. Snip a tiny corner off the baggy and drizzle in a zigzag motion over chocolate-coated trees. Allow chocolate to set, about 5 minutes.
Notes
- Store in an airtight container in the refrigerator for up to 1 week.
- For best results, use a sharp cookie cutter to ensure clean edges.
- If the peanut butter mixture is too sticky, chill it longer before cutting.
Nutrition
- Serving Size: 1 tree
- Calories: 428 kcal
- Sugar: 35 g
- Sodium: 120 mg
- Fat: 25 g
- Saturated Fat: 10 g
- Unsaturated Fat: 12 g
- Trans Fat: 0 g
- Carbohydrates: 45 g
- Fiber: 3 g
- Protein: 8 g
- Cholesterol: 15 mg


