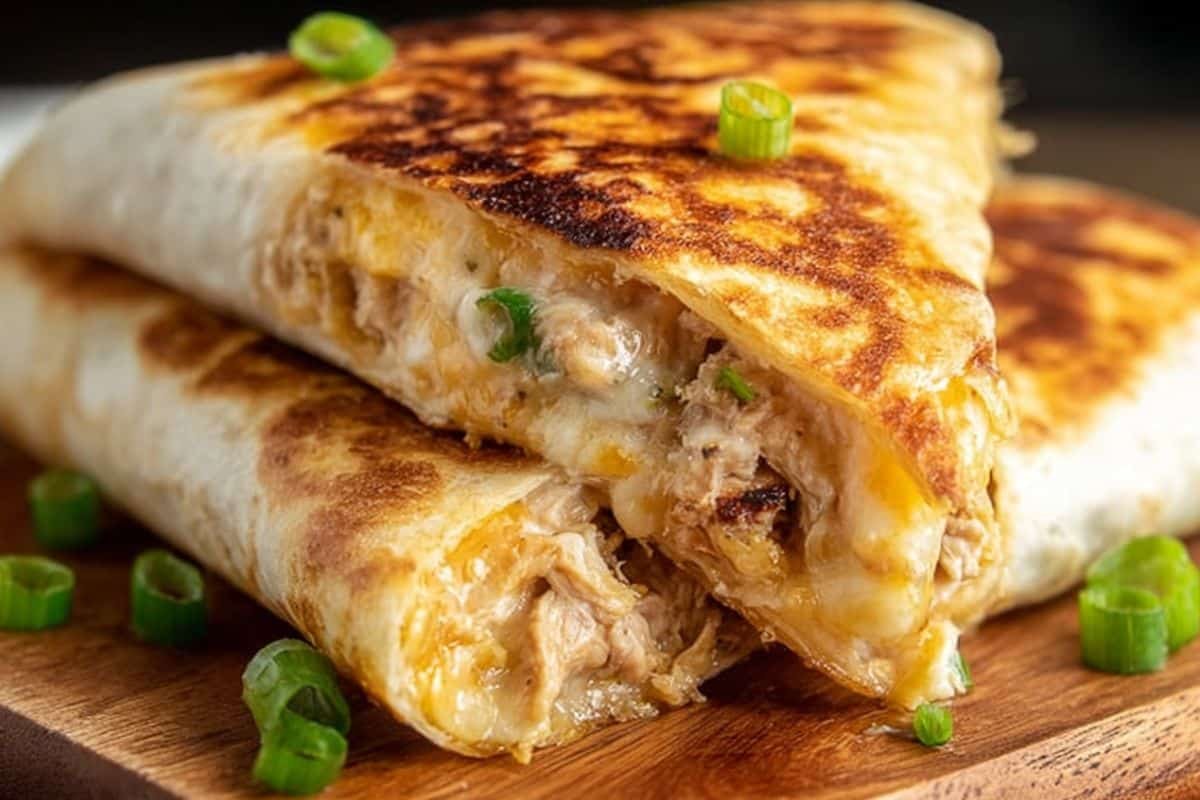
Cheesy Garlic Chicken Wraps are a dreamy combination of creamy, spicy, and melty goodness all wrapped up in a warm tortilla. This recipe strikes a beautiful balance: indulgent yet approachable. Whether you’re cooking for lunch, a casual dinner, or a fun snack, these wraps are quick to assemble and deliver big on flavor. In just about 20 minutes, you get a satisfying, protein-rich meal that’s versatile and crowd-pleasing. The garlic‑cheese chicken filling is the kind of comfort food you’ll want on repeat—so let’s dig in!
Why You’ll Love This Recipe
-
Fast but flavorful: With cooked chicken and pantry staples, the prep is minimal.
-
Customizable heat & cheese level: You can dial the spiciness or cheesiness up or down.
-
Melty, crispy contrast: The golden wrap exterior and gooey interior is pure comfort.
-
Flexible for leftovers: The filling keeps well, and you can use it in quesadillas, toasties, or potato fillings.
-
Balanced but satisfying: You get protein, and you can pair with a salad or veggies to round out the meal.
Ingredients
Here’s a refreshed version of the ingredient list to keep things clear:
-
2 large tortillas (regular, low‑carb, or high‑protein)
-
~200 g (7 oz) cooked chicken, chopped (rotisserie works great)
-
2 garlic cloves, minced or grated (adjust to taste)
-
2 tbsp light mayonnaise
-
1 tbsp light Greek yogurt or plain yogurt
-
2 tsp hot sauce (e.g. Frank’s or your preferred)
-
¼ tsp salt
-
~90 g (3 oz) grated cheese (I used a cheddar blend)
-
1 green onion, chopped
-
Olive oil spray or a light brush of oil
Step‑by‑Step: How to Make Cheesy Garlic Chicken Wraps
-
Make the filling
In a mixing bowl, combine the chopped chicken, minced garlic, mayonnaise, yogurt, hot sauce, and salt. Stir until well coated. -
Assemble the wrap
Lay your tortilla flat. On the lower third of the tortilla, sprinkle about 2 tablespoons of cheese.
Top that with about ⅔ cup of the chicken mixture.
Add another tablespoon of cheese over the filling and sprinkle with chopped green onion. -
Fold and roll
Fold in the sides of the tortilla inward, then roll from the bottom edge up toward the top into a tight wrap. -
Cook to crisp
Heat a nonstick pan over medium‑high heat and lightly spray or brush with olive oil.
Place the wraps seam-side down onto the pan.
Cook for 3–4 minutes on each side until the wrap is golden brown and crisp. Cover the pan with a lid to trap heat and ensure the cheese melts thoroughly inside. -
Slice and serve
Once cooked, transfer to a cutting board, slice the wrap in half, and serve immediately.
Helpful Tips

-
Covering the pan when cooking helps retain heat and ensures the cheese melts well.
-
Don’t overstuff the wrap—if it’s too full, it may burst during cooking.
-
Use a gentle but firm press while cooking to help flatten the wrap slightly and promote crispiness.
-
If you find your tortilla is too stiff or cracking, warm it briefly (10–15 seconds) in the microwave before assembling.
-
Use a good nonstick pan or a well-seasoned skillet to reduce sticking.
Substitutions And Variations
-
Cheese swap: Use mozzarella, pepper jack, Monterey jack, or a Mexican blend.
-
Spice swap: Replace hot sauce with sriracha, chipotle sauce, or a dash of cayenne.
-
Healthier swaps: Use low‑fat cheese or reduce the amount of cheese. Use Greek yogurt in place of mayo entirely.
-
Add-ins: Throw in diced bell pepper, corn, black beans, or spinach for more texture and color.
-
Alternative wraps: Use whole wheat tortillas, spinach wraps, gluten‑free wraps, or low‑carb tortillas.
-
Cooking methods: Try air fryer (375 °F / ~190 °C for 6–8 minutes) or oven bake (400 °F / ~200 °C for 10–12 minutes, flipping once). The pan gives the crispiest result.
Storage Instructions
-
Wraps (cooked): Store in an airtight container in the refrigerator for up to 2 days. Reheat in a skillet or air fryer to crisp them back up.
-
Filling (uncooked): You can store the chicken mixture (without assembling) in the fridge for up to 3 days.
-
Freezing: I don’t recommend freezing already wrapped and cooked wraps, as the texture suffers. But the filling can be frozen (in a sealed container or bag) for up to 1 month. Thaw overnight before using.
Nutritional Information
(Approximate per wrap, using the original quantities for 2 wraps)
-
Calories: ~476 kcal
-
Carbohydrates: ~19 g
-
Protein: ~38 g
-
Fat: ~27 g
-
Saturated Fat: ~11 g
-
Polyunsaturated Fat: ~5 g
-
Monounsaturated Fat: ~7 g
-
Trans Fat: ~0.01 g
-
Cholesterol: ~120 mg
-
Sodium: ~1090 mg
-
Potassium: ~347 mg
-
Fiber: ~1 g
-
Sugar: ~2 g
-
Vitamin A: ~543 IU
-
Vitamin C: ~5 mg
-
Calcium: ~376 mg
-
Iron: ~3 mg
Keep in mind: nutrition will shift based on the type of tortilla, cheese, and whether you reduce or swap ingredients.
Serving Suggestions
-
Pair with a crisp green salad (think mixed greens, cucumber, tomato) for freshness.
-
Serve with roasted vegetables or a side of steamed broccoli.
-
Offer pickles, salsa, or hot sauce on the side for dipping or extra zing.
-
Add tortilla chips or sweet potato fries to round out the meal.
-
For a more complete lunch box, slice the wrap and serve with carrot sticks and a yogurt‑based dip.
Frequently Asked Questions About Cheesy Garlic Chicken Wraps
Q: Can I use raw chicken instead of cooked?
A: Yes, but be sure to fully cook the chicken first—whether you grill, bake, or pan-sear it—before combining it with the other ingredients.
Q: Will the wrap get soggy over time?
A: It might soften if stored. That’s why I recommend storing cooked wraps for only up to 2 days and reheating in a skillet or air fryer to crisp them again.
Q: Can I make this gluten-free?
A: Absolutely. Swap in gluten‑free tortillas or wraps. Just check that your hot sauce, tortillas, and other components are gluten‑free.
Q: How can I reduce the sodium?
A: Use a low-sodium hot sauce, pick a low-sodium cheese, and reduce added salt. Also choose tortillas that aren’t heavily salted.
Q: Can I prep ahead for a crowd?
A: Yes. Prepare the filling 1–2 days in advance. At serving time, assemble and cook the wraps. Alternatively, you can partly assemble (wraps without cooking) and then crisp them at serving time.
Q: Is it safe to reheat more than once?
A: Try to reheat only once. Reheating multiple times can degrade texture and food quality. If you plan to reheat, store everything in microwave‑safe or oven-safe containers and re-crisp in a skillet or air fryer.
Q: What if my wrap falls apart while cooking?
A: Make sure you fold tightly and seal the seam side down first to “glue” it shut. Also avoid overfilling. Cooking seam-side down first helps seal it.
Conclusion
I hope you enjoy making these Cheesy Garlic Chicken Wraps as much as I do. There’s something so satisfying about a warm, crispy wrap with a gooey, flavorful filling inside. They’re easy enough for weeknights, yet delicious enough to feel special—and the fact that much of it can be prepped ahead makes life easier in the kitchen. Thank you for being here, for trying new recipes, and for sharing the joy of food. I truly hope these wraps bring a smile to your table, and that each bite reminds you how fun simple ingredients can be when you get creative. Happy cooking, and enjoy every melty, garlicky moment!
Print
Cheesy Garlic Chicken Wraps
- Prep Time: 10 minutes
- Cook Time: 10 minutes
- Total Time: 20 minutes
- Yield: 2 wraps 1x
- Category: Lunch, Dinner
Description
Cheesy Garlic Chicken Wraps are a quick, satisfying recipe with crispy tortillas and a creamy, garlicky chicken filling. Melty cheese and spicy sauce give these wraps bold flavor in every bite—ready in just 20 minutes!
Ingredients
2 large tortillas (regular or low-carb/high-protein)
200g (7 oz) cooked chicken, chopped (rotisserie works great)
2 garlic cloves, minced or grated
2 tbsp light mayonnaise
1 tbsp light Greek yogurt or plain yogurt
2 tsp hot sauce (like Frank’s)
¼ tsp salt
90g (3 oz) grated cheese (cheddar blend)
1 green onion, chopped
Olive oil spray
Instructions
-
Make the filling
In a mixing bowl, combine the chopped chicken, minced garlic, mayonnaise, yogurt, hot sauce, and salt. Stir until well coated. -
Assemble the wrap
Lay your tortilla flat. On the lower third of the tortilla, sprinkle about 2 tablespoons of cheese.
Top that with about ⅔ cup of the chicken mixture.
Add another tablespoon of cheese over the filling and sprinkle with chopped green onion. -
Fold and roll
Fold in the sides of the tortilla inward, then roll from the bottom edge up toward the top into a tight wrap. -
Cook to crisp
Heat a nonstick pan over medium‑high heat and lightly spray or brush with olive oil.
Place the wraps seam-side down onto the pan.
Cook for 3–4 minutes on each side until the wrap is golden brown and crisp. Cover the pan with a lid to trap heat and ensure the cheese melts thoroughly inside. -
Slice and serve
Once cooked, transfer to a cutting board, slice the wrap in half, and serve immediately.
Notes
Cover the pan to melt the cheese faster.
Make the filling up to 3 days in advance.
Air fry at 375°F for 6–8 minutes.
Bake at 400°F for 10–12 minutes, flipping once.
Filling can be frozen for up to 1 month.
Nutrition
- Serving Size: 1 wrap
- Calories: 476 kcal
- Sugar: 2 g
- Carbohydrates: 19 g
- Protein: 38 g