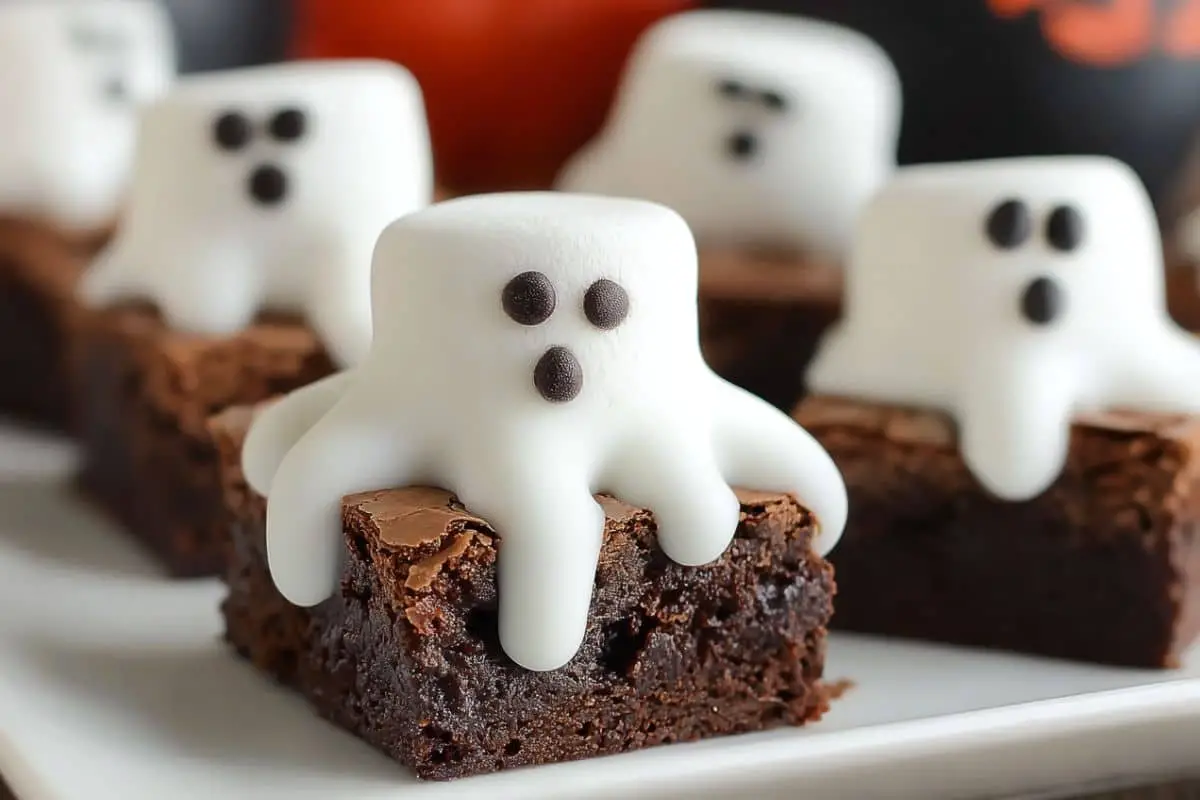
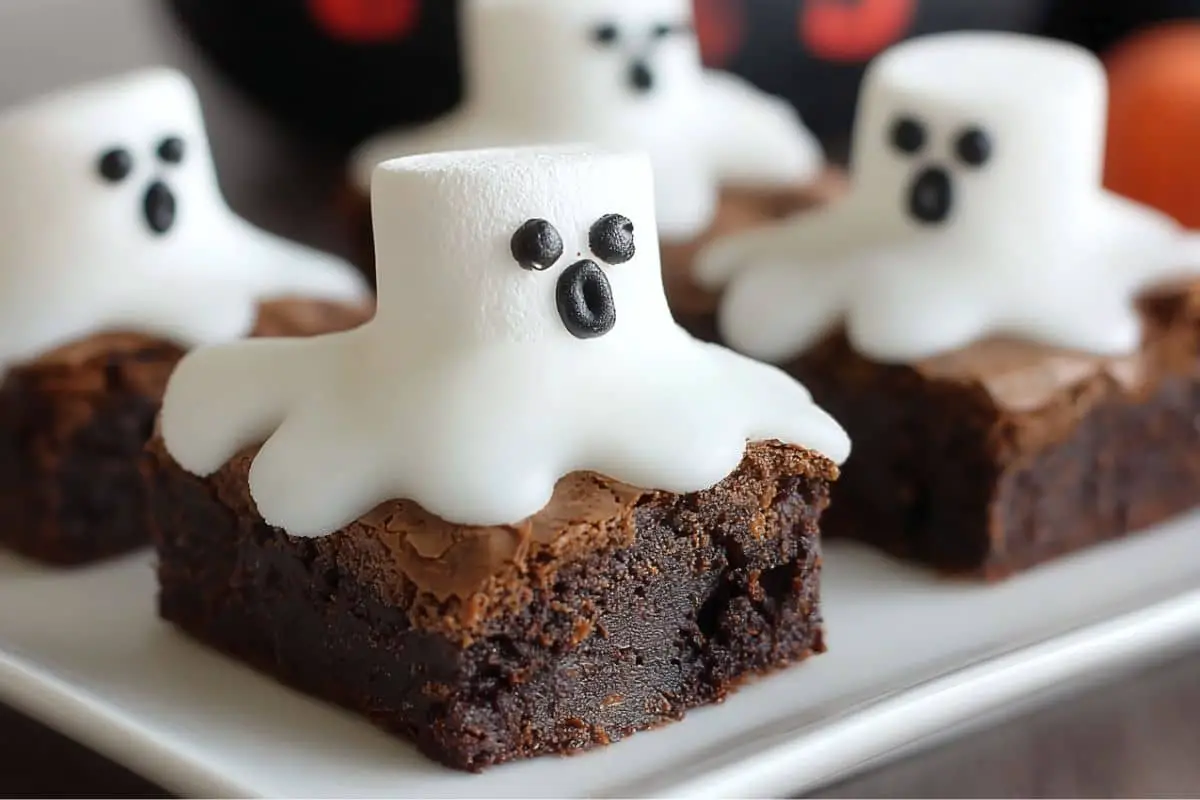
Halloween Ghost Brownies are the ultimate festive treat for fall parties, trick‑or‑treat gatherings, or cozy nights in. This playful dessert combines fudgy brownies with fluffy marshmallow ghosts to create a spooktacular delight. The combination of a rich chocolate base and sweet icing makes them a crowd‑pleaser for kids and adults alike. In this post, you’ll learn how easy it is to transform a simple box mix into charming ghostly squares. With step‑by‑step instructions, helpful tips, and creative variations, you’ll be ready to wow your friends this Halloween.
Why You’ll Love Halloween Ghost Brownies
You’ll love these brownies because they deliver on three fronts: simplicity, visual appeal, and taste.
- Simplicity: The recipe starts with a boxed brownie mix, cutting down on prep time and complexity.
- Visual appeal: The marshmallow ghost icing turns ordinary brownies into an enchanting Halloween treat that doubles as décor.
- Taste: You still get all the fudgy, chocolatey goodness—just wrapped in a charming ghostly costume.
Plus, they’re customizable for dietary needs or flavor preferences, making them a fun canvas for creativity.
Ingredients
Here’s what you need:
- 1 box brownie mix (choose a brand you love—e.g. Betty Crocker, Ghirardelli, or your favorite)
- Ingredients called for on the brownie mix box (usually eggs, oil, water)
- 9 large marshmallows
- 1¾ cups confectioners’ sugar (powdered sugar)
- ½ teaspoon vanilla extract
- 2–3 teaspoons water (start with 1 tsp, then adjust)
- 1–2 drops black food gel or black food coloring
Note: The amount of water for the icing is approximate — you’ll adjust for consistency.
Step‑by‑Step: How to Make Halloween Ghost Brownies
1. Bake the Brownies
- Preheat the oven as directed on your brownie mix box.
- Line a 9″ × 9″ square baking pan with parchment paper, leaving overhang on two opposite sides for easy lifting.
- Prepare the brownie batter according to the package instructions (mixing eggs, oil, water, or other ingredients as required).
- Pour the batter into the lined pan and smooth the top.
- Bake as instructed until a toothpick inserted comes out with moist crumbs (not raw batter).
- Remove from oven and let brownies cool completely in the pan (this helps them hold their shape when cutting).
2. Make the Ghost Icing
While the brownies cool, whip up the icing:
- In a bowl, combine 1¾ cups confectioners’ sugar with ½ teaspoon vanilla extract.
- Add 1 teaspoon water, then stir vigorously until smooth.
- Check the consistency: It should be thick enough to coat but still flow slightly.
- If too watery (transparent or runny), add more powdered sugar a tablespoon at a time.
- If too thick or stiff, add a drop more water until it loosens just enough.
- Cover the bowl with a damp cloth (or lightly damp paper towel) to prevent a crust from forming while you wait.
3. Slice the Brownies
- Once brownies are fully cooled, use the parchment overhang to lift them out.
- Use a sharp knife (wipe between cuts) to slice into 9 even squares.
4. Assemble the Ghosts
- Spoon your icing into a pastry piping bag (or a zip-top bag with the corner snipped).
- Pipe a small dime-sized dollop of icing in the center of each brownie square.
- Place one large marshmallow on each dollop—this anchors the marshmallow to the brownie.
- Let them sit a few minutes so the marshmallow adheres.
5. Coat and Shape the Ghost
- Begin piping from the top of the marshmallow, flowing downward to coat the front and sides.
- Allow some icing to pool at the base and drip onto the brownie to give a “ghost tail” effect.
- Let the white icing set (this can take a few minutes) until it’s stable and not tacky.
6. Add Ghostly Faces
- Dye a tiny portion of the remaining icing with 1–2 drops of black food gel to make it gray/black.
- Use a toothpick or fine tip to pipe two eyes and a mouth onto each ghost.
- Let fully set before serving.
7. Serve & Enjoy
Once the icing is firm, these Halloween Ghost Brownies are ready to delight. Serve them on a themed platter or napkins for extra flair.
Helpful Tips

- Wipe the knife between cuts to get clean brownie edges.
- Test-spot icing consistency on a scrap surface (plate or parchment) before piping on the real thing.
- Pipe slowly to control how the icing flows; let gravity help for the “ghost tail.”
- Set on a wire rack over parchment while icing to catch drips and keep your workspace clean.
- Work in small batches so the icing doesn’t dry out before piping. Keep unused icing covered.
- Temperature matters — if your kitchen is very warm, the icing may be looser; you may need less water or more powder sugar.
Substitutions And Variations
- Gluten‑free: Use a gluten‑free brownie mix.
- Vegan: Use a vegan brownie mix and marshmallows (check labels), plus a plant-based milk or binder if needed.
- Flavored icing: Add a drop of mint, almond, or orange extract to the white icing for a hint of flavor.
- Colorful ghosts: Instead of white, tint the icing pastel colors or spooky green or purple for fun variation.
- Mini ghosts: Use mini marshmallows on brownie bites (same technique but in mini form).
- Chocolate ghosts: Use a chocolate glaze instead of white icing, then draw faces with white and dark chocolate.
Storage Instructions
- Store at room temperature, covered, for up to 2 days (keep in an airtight container).
- To extend life, refrigerate in a cool spot; bring to room temperature before serving for best texture.
- Avoid stacking the ghosts — place parchment in between layers if you must stack.
- These are best eaten within a few days; beyond that the marshmallow may lose its texture and the brownie may dry slightly.
Nutritional Information
(Approximate per ghost brownie — based on standard boxed brownie recipe and ingredients; may vary by brand and portion size.)
| Component | Estimate |
|---|---|
| Calories | ~200–250 kcal |
| Total Fat | ~8–12 g |
| Saturated Fat | ~3–5 g |
| Carbohydrates | ~30–35 g |
| Sugars | ~20–25 g |
| Protein | ~2–3 g |
| Fiber | ~1–2 g |
| Sodium | ~100–150 mg |
Note: These are rough estimates. For precise values, plug in the nutritional content from your brownie mix and the sugar/vanilla/icing amounts into a nutrition calculator.
Serving Suggestions
- Serve on black or orange platters to contrast the white ghosts.
- Pair with vanilla ice cream or whipped cream to complement the chocolate base.
- Add a dusting of powdered sugar or cocoa around the platter for a finishing touch.
- Serve with hot apple cider, pumpkin spice lattes, or milk for a cozy autumn vibe.
- Decorate the serving area with mini pumpkins, spider webs, or Halloween sprinkles.
Frequently Asked Questions About Halloween Ghost Brownies
Q: Can I use homemade brownies instead of a boxed mix?
Absolutely! If you prefer from‑scratch brownies, simply bake in a 9″ × 9″ pan, cool thoroughly, then follow the same steps for icing and decorating. The ghost technique works the same no matter the brownie base.
Q: What if the marshmallow ghosts slide off?
Make sure your brownie surface is cool and stable, and use a firm (but not too stiff) icing dollop under the marshmallow as “glue.” Let it sit a few minutes before piping. If needed, use an extra dot of icing at the base to anchor it.
Q: How do I fix runny icing?
If your white icing is too thin, add more confectioners’ sugar a little at a time until you reach a thicker consistency. Let the icing rest a minute before trying again. Work quickly before the icing crusts.
Q: Can I prepare these in advance?
You can bake the brownies ahead and freeze (unfrosted). Thaw them, then slice and decorate the same day you’ll serve. But once decorated, best consumed within 24–48 hours for freshness.
Q: My black icing looks gray — any tips?
Black food gel works best (concentrated). Add very little by little — it often takes many tiny drops to get true black. Use a toothpick to stir it in so you don’t overdo it.
Q: Can I scale up the recipe?
Yes — use a bigger pan (e.g. 9″ × 13″) and increase marshmallows, icing proportionally. Just ensure each ghost has enough icing coverage.
Q: Can children help decorate?
Definitely! Piping and drawing faces are fun for older kids (with supervision). It’s a great activity for Halloween baking together.
(Total ~150 words in FAQs section)
Conclusion
Thank you so much for reading and exploring this fun spin on classic brownies! Making Halloween Ghost Brownies has become one of my favorite seasonal traditions. I love how simple ingredients transform into a memorable, spooky dessert that brings smiles to all ages. Whether you’re making this for a party, your family, or just for fun, the ease and charm of the design make it so rewarding. I hope you enjoy this recipe as much as I do, and that it becomes a beloved treat in your Halloween lineup. Happy baking — and may your ghosts be delicious! 🎃
Print
Halloween Ghost Brownies
- Total Time: 40 minutes
- Yield: 9 brownies 1x
Description
Halloween Ghost Brownies are easy-to-make Halloween treats made with boxed brownie mix, marshmallows, and a simple icing. They’re spooky, fun, and perfect for Halloween parties or baking with kids!
Ingredients
1 box brownie mix (plus ingredients on box: eggs, oil, water)
9 large marshmallows
1¾ cups confectioners’ sugar
½ teaspoon vanilla extract
2–3 teaspoons water
1–2 drops black food gel
Instructions
Bake the Brownies
- Preheat the oven as directed on your brownie mix box.
- Line a 9″ × 9″ square baking pan with parchment paper, leaving overhang on two opposite sides for easy lifting.
- Prepare the brownie batter according to the package instructions (mixing eggs, oil, water, or other ingredients as required).
- Pour the batter into the lined pan and smooth the top.
- Bake as instructed until a toothpick inserted comes out with moist crumbs (not raw batter).
- Remove from oven and let brownies cool completely in the pan (this helps them hold their shape when cutting).
2. Make the Ghost Icing
While the brownies cool, whip up the icing:
- In a bowl, combine 1¾ cups confectioners’ sugar with ½ teaspoon vanilla extract.
- Add 1 teaspoon water, then stir vigorously until smooth.
- Check the consistency: It should be thick enough to coat but still flow slightly.
- If too watery (transparent or runny), add more powdered sugar a tablespoon at a time.
- If too thick or stiff, add a drop more water until it loosens just enough.
- Cover the bowl with a damp cloth (or lightly damp paper towel) to prevent a crust from forming while you wait.
3. Slice the Brownies
- Once brownies are fully cooled, use the parchment overhang to lift them out.
- Use a sharp knife (wipe between cuts) to slice into 9 even squares.
4. Assemble the Ghosts
- Spoon your icing into a pastry piping bag (or a zip-top bag with the corner snipped).
- Pipe a small dime-sized dollop of icing in the center of each brownie square.
- Place one large marshmallow on each dollop—this anchors the marshmallow to the brownie.
- Let them sit a few minutes so the marshmallow adheres.
5. Coat and Shape the Ghost
- Begin piping from the top of the marshmallow, flowing downward to coat the front and sides.
- Allow some icing to pool at the base and drip onto the brownie to give a “ghost tail” effect.
- Let the white icing set (this can take a few minutes) until it’s stable and not tacky.
6. Add Ghostly Faces
- Dye a tiny portion of the remaining icing with 1–2 drops of black food gel to make it gray/black.
- Use a toothpick or fine tip to pipe two eyes and a mouth onto each ghost.
- Let fully set before serving.
7. Serve & Enjoy
Once the icing is firm, these Halloween Ghost Brownies are ready to delight. Serve them on a themed platter or napkins for extra flair.
Notes
Use a gluten-free or vegan mix to fit dietary needs.
Work in small batches to prevent icing from drying.
Add flavored extracts like mint or almond to the icing for a twist.
- Prep Time: 15 minutes
- Cook Time: 25 minutes
- Category: Dessert
Nutrition
- Serving Size: 1 brownie
- Calories: 220 kcal
- Sugar: 23 g
- Carbohydrates: 33 g
- Protein: 2 g

